Quantcast
Channel: Windows Apps Archives - Beebom
Viewing all 203 articles
Browse latest View live

How to Perform Windows 10 Password Reset

$
0
0

How to Perform Windows 10 Password Reset [Updated]

Passwords are hard to remember and keep track of especially if you are not using a competent password manager. The password that I forget the most is of my Windows 10 PC because I generally use Windows Hello to login. Since I don’t input my password for months, I tend to forget it when I need it. If you also can’t remember your Windows PC’s password, there is nothing to worry. In this article, we have provided three easy ways to perform Windows 10 password reset. All the mentioned methods are easy and can be done by anyone without requiring any expertise on Windows. Also, you don’t have to worry about data loss. We have made sure the data is completely safe during the password reset process. Now without taking much time, let’s begin with the guide.

Perform Windows 10 Password Reset

Here, we will learn about three different ways to reset Windows 10 password. All the methods are for different case scenarios so choose anyone depending on your issue. Also, the below methods work in all versions of Windows 10 so you don’t have to worry about it. Now having said that, let’s begin with the first method.

1. Windows 10 Password Reset [If You Remember the PIN]

If you have forgotten the password of your Windows 10 PC, but you are able to log in through PIN or picture password, this is how you can reset Windows 10 password.

1. Press “Windows” and “X” key at once and click on “Command Prompt (Admin)”. If you are unable to find it, you can also search for “cmd” and open it as an Administrator.

Windows 10 Password Reset [If You Remember the PIN]

2. Next, type the following command. Here, replace account_name with your actual account name and password to your liking.

net user account_name new_password

Windows 10 Password Reset [If You Remember the PIN] 2

3. After that, hit enter and you have done a successful Windows 10 password reset.

Windows 10 Password Reset [If You Remember the PIN] 3

2. Windows 10 Password Reset [If Logged in with Microsoft Account]

If you were using your Microsoft Account to log in on your Windows 10 PC then this is how you can perform a Windows 10 password reset.

1. Open the Microsoft password recovery page on a different PC or mobile and enter your email or username. After that, click on “Next”.

Windows 10 Password Reset [If Logged in with Microsoft Account]

2. Now, it will show you a few options to verify your identity. You can choose your phone number or recovery email id where you will receive the one time password.

Windows 10 Password Reset [If Logged in with Microsoft Account] 2

3. Enter the one time password on the next screen and then you can perform a Windows 10 password reset.

Windows 10 Password Reset [If Logged in with Microsoft Account] 5

4. After that, log in to your Windows 10 PC with the new password and you should get in without any issues.

3. Windows 10 Password Reset [If Everything Fails]

When everything fails, use this method to perform Windows 10 Password reset. You can use this method on all versions of Windows 10 and it works absolutely great.

1. On the Windows login screen, press and hold the shift key and click on the power button. Here, click on “Restart” while holding the shift key.

Windows 10 Password Reset [If Everything Fails]

2. The computer will boot to Advanced Recovery screen. Here, click on “Troubleshoot” and then open “Advanced Options”. Finally, click on “System Image Recovery”.

Windows 10 Password Reset [If Everything Fails] 2

3. Here, click on “Select a system image” and then click on the “Next” button.

Windows 10 Password Reset [If Everything Fails] 3

4. On the next page, click on the “Advanced” button.

Windows 10 Password Reset [If Everything Fails] 4

5. Now, select “Install a Driver” option.

Windows 10 Password Reset [If Everything Fails] 5

6. After that, click on “OK” and a file explorer window will open. Here, move to the C drive or whichever drive you have installed Windows on. Now navigate to C:\Windows\System32 folder.

Windows 10 Password Reset [If Everything Fails] 6

7. Here, look for “Utilman” and rename it to anything you want. For example, I have renamed it to “Utilman1”.

Windows 10 Password Reset [If Everything Fails] 7

8. After that, look for “cmd” in the same folder and rename it to “Utilman”.

Windows 10 Password Reset [If Everything Fails] 8

9. Now, close all the window and restart your computer. On the login screen, click on the “Accessibility” icon at the bottom-right corner.

Windows 10 Password Reset [If Everything Fails] 9

10. A command prompt window will open. Here, type the following command and hit enter.

control userpasswords2

Windows 10 Password Reset [If Everything Fails] 10

11. A new password recovery window will open. Here, click on the “Reset Password” button.

Windows 10 Password Reset [If Everything Fails] 11

12. Set a new password and click on the “Ok” button. Finally, you have successfully performed Windows 10 password reset.

Windows 10 Password Reset [If Everything Fails] 12

13. Now, log in to your account with the new password and voila, you are signed in to your Windows 10 PC.

SEE ALSO: How to Reset Windows 10 in 2019 [Guide]

Rest Your Windows 10 Password Without Losing Files

So that was our nifty guide on how to rest password on Windows 10 without losing any data. We have mentioned three methods for different scenarios. However, if nothing works, you can use the third method to log in to your Windows 10 PC. But do note that Microsoft keeps fixing new loopholes so there will be new ways to reset Windows 10 password in the future. So keep visiting our website to find out new and updated techniques to reset the password on Windows 10. Anyway, if you liked the article and want to see similar posts, do comment down below and let us know.


How to Fix High CPU Usage After Windows 10 KB4512941 Update

$
0
0

How to Fix High CPU Usage After Windows 10 KB4512941 Update

As it’s always the case, with a new Windows update come new bugs. Just recently, Microsoft released a cumulative update on August 30 named KB4512941 which has started causing major CPU spikes with abnormally high usage. Many Windows users are facing this issue particularly after installing the KB4512941 update. So, if you are one of those affected users and looking for a solution, you have come to the right place. Here, we have provided two simple ways to fix the high CPU usage that is occurring after the Windows 10 KB4512941 update. Both the methods are easy and straightforward so no worries there. Now without further ado, let’s go through the steps.

Fix High CPU Usage After KB4512941 Update

Before we fix the issue, let’s first understand what is causing the CPU to spike abnormally. With the KB4512941 update, Windows integrated Cortana with SearchUI.exe system-wide. As a result, Cortana keeps running in the background, eating too much system resources and causing the CPU spike. Now that we have run through the cause, let’s fix the problem. There are two easy ways to resolve the high CPU Usage on the latest Windows 10. Either, we can uninstall the KB4512941 update altogether or replace Cortana search with Bing Search. At first, we will go through the first method and then will move to the second method. Now having said that, here is how to do it.

Note: With either method, you won’t lose any data so there is nothing to worry.

  • Uninstall KB4512941 Update

1. Open Windows Settings or simply press Windows + I shortcut to open it. After that, open Update and Security.

How to Fix High CPU Usage After KB4512941 Update on Windows 10

2. Here, click on “View Update History”.

Uninstall KB4512941 Update 2

3. Now, click on “Uninstall Updates” on the top.

How to Fix High CPU Usage After KB4512941 Update on Windows 10 (2)

4. Here, you will find the KB4512941 update. Right-click on it and select “Uninstall”.

Uninstall KB4512941 Update 4

5. It will ask for your confirmation. Click on “Yes”.

Uninstall KB4512941 Update 5

6. Now restart your PC and your computer will be back to the stable 18362.295 build. Following that, you won’t face any high CPU usage on Windows 10.

  • Disable Cortana Search

Here, we will use Windows Registry to disable Cortana Search and replace it with Bing Search. The good part is that you will still be on the latest Windows 10 build, but without any performance issues. Here are the simple steps to follow.

1. Press the Windows key once and type Regedit. It will show up on the top. Open it.

Disable Cortana Search

2. Now, navigate to this path manually or you can paste the Registry address on the address bar to quickly open the said menu.

HKEY_CURRENT_USER\Software\Microsoft\Windows\CurrentVersion\Search

How to Fix High CPU Usage After KB4512941 Update on Windows 10 3

3. Here, look for “BingSearchEnabled” keyword. Generally, it should be on top. Double-click on it and change “Value Data” to 1 and click the “OK” button.

Disable Cortana Search 2

4. Once you have done that, close the Registry and restart your computer. Voila, now Bing Search should be back and you should not face any unusual CPU spikes.

SEE ALSO: How to Speed up Windows 10 in 2019 [Effective Methods]

Resolve High CPU Usage on Windows 10 with Simple Steps

So that was our quick guide on how to fix high CPU usage after installing KB4512941 update on Windows 10. As I have already mentioned, the problem is simple and so is the solution. I have mentioned two easy ways to deal with the issue so that you can choose accordingly. You can altogether uninstall the update or remain on the latest build after tweaking Registry. Anyway, that is all from our side. If you are facing some other issues on Windows 10, do comment down below and let us know. We will be happy to take a look.

How to Resolve Microphone Issues in Windows 10

$
0
0

How to Resolve Microphone Bug in Windows 10

Microsoft is putting all its resources on Windows 10, and yet, after every major update, it somehow manages to break basic features. Just recently, following the Windows 10 update on September 10, many users faced microphone issues on the latest build. To be frank, microphone problems on Windows 10 are not new and they have been bugging users since a very long time. Nevertheless, in this article, we are going to show you how to resolve microphone issues in Windows 10. We have provided four different ways to fix the issue and the steps are quite easy and straightforward. Now having said that, let’s begin the article.

Fix Microphone Issues in Windows 10 in 2019

As already mentioned, we have included 4 different ways to fix the microphone bug. The methods are quite simple and anyone with basic computer knowledge can resolve the issue. With that said, here is the first method that you should begin with.

1. Manage Microphone from Windows Settings

Before we dive into advanced settings, let’s ensure that microphone settings are correctly configured. To do so, we will go through some Windows Settings first and then move to advanced steps. Here is the first step to follow.

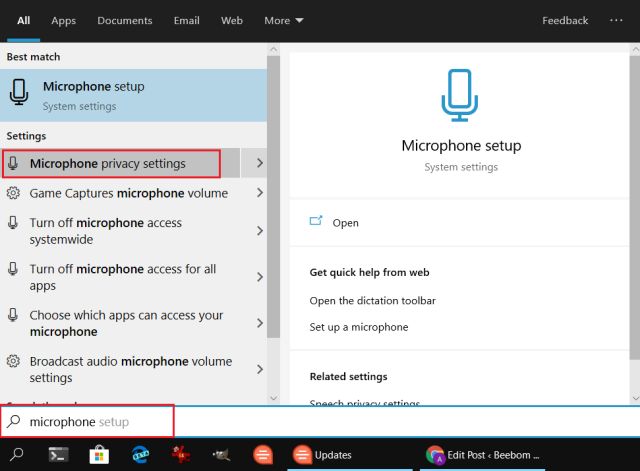
1. Press the Windows key once and type “microphone” in the search box. Click on “Microphone Privacy Settings” from the search result.

1. Manage Microphone from Windows Settings Solve Microphone Bug in Windows 10

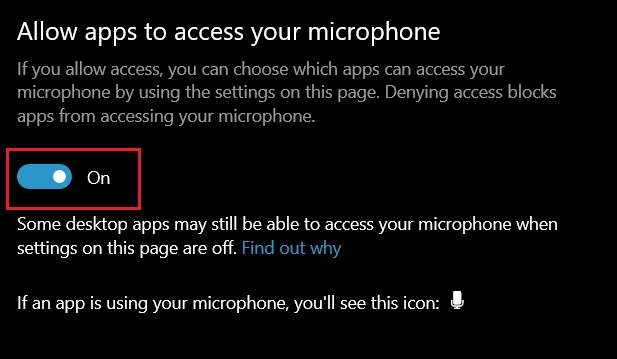
2. Here, make sure “Allow apps to access your microphone” is turned on.

1. Manage Microphone from Windows Settings (2)

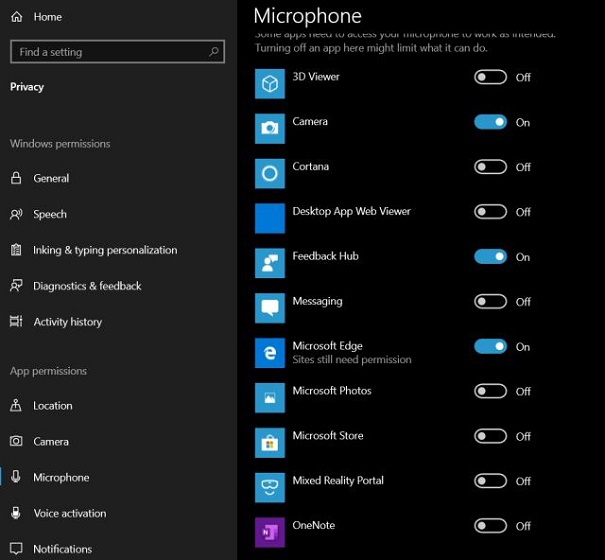
3. After that, scroll down and inspect microphone access for all apps. Turn on microphone permission for apps that you particularly use for video calling or audio recording. Similarly, turn off microphone access for apps that you don’t use often.

1. Manage Microphone from Windows Settings (3)

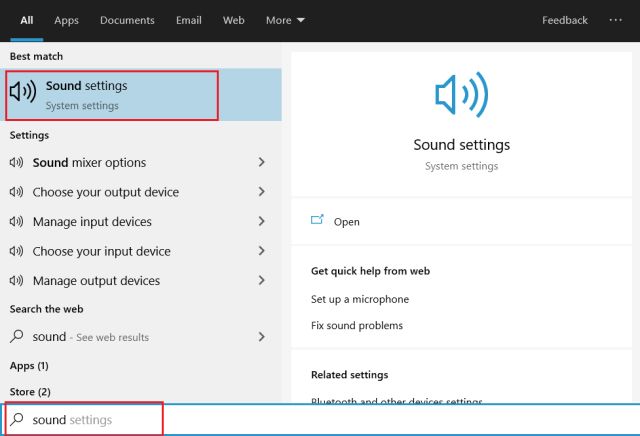
4. Now, close the window and type “sound” in the Windows search box. Here, click on “Sound Settings”.

1. Manage Microphone from Windows Settings (4) Solve Microphone Bug in Windows 10

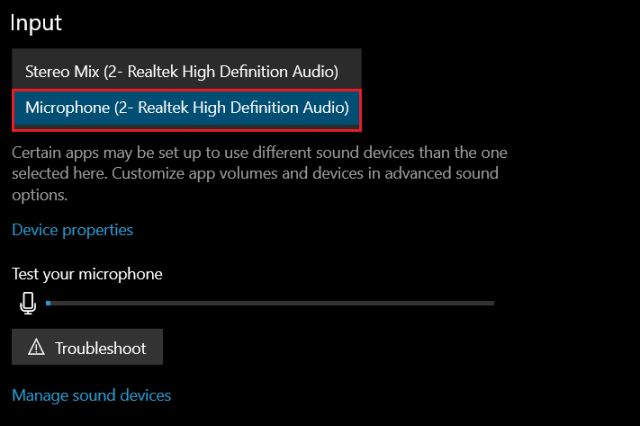
5. Scroll down and you will find “Input” section. Here, make sure to select your microphone from the drop-down menu. In case, it does not have any microphone listing, chances are your microphone is damaged or there are driver issues. I have explained how to update the audio driver in the last section of this article so go through that.

1. Manage Microphone from Windows Settings (5)

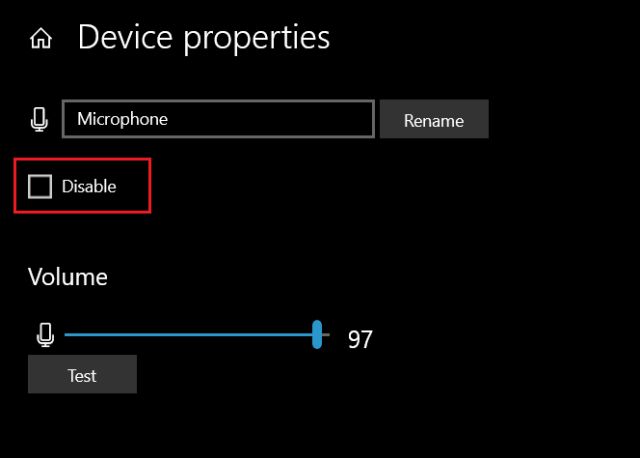
6. Next, click on “Device properties” just below the mic setting. Here, make sure the “Disable” box is unchecked. Now, restart your computer and check if the microphone is working in Windows 10.

1. Manage Microphone from Windows Settings (6) Fix Microphone Issues on Windows 10

2. Configure Microphone Settings from Control Panel

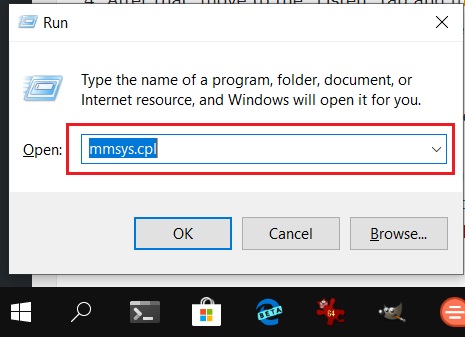
1. Press “Windows” and “R” key at once and a small Run window will open up at the bottom-left corner. Here, type “mmsys.cpl” and hit enter.

2. Configure Microphone Settings from Control Panel

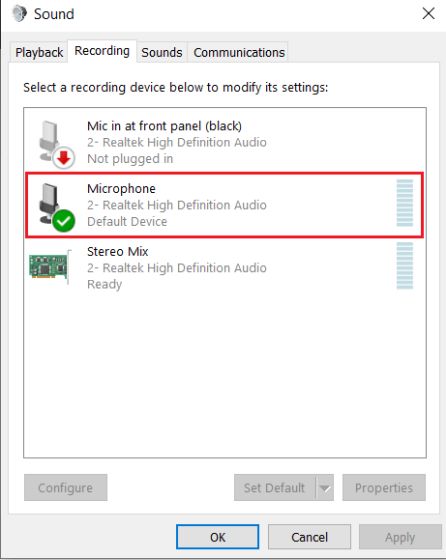
2. A sound window will open. Here, move to the “Recording” tab and you will find your microphone device here. Double-click on it and a properties window will open.

2. Configure Microphone Settings from Control Panel (2) Fix Microphone Issues on Windows 10

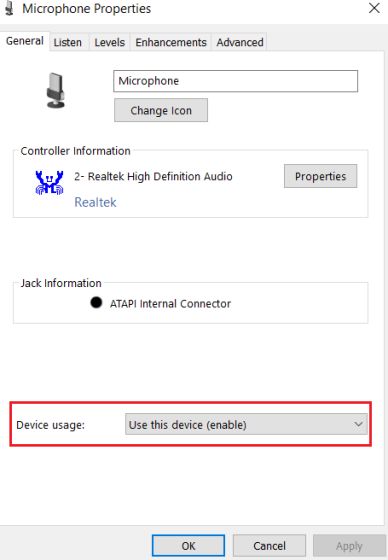
3. Here, on the General tab, make sure “Device Usage” is enabled.

2. Configure Microphone Settings from Control Panel (3)

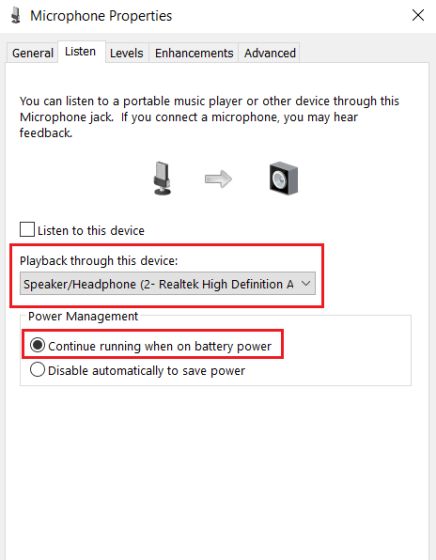
4. After that, move to the “Listen” tab and manually select your microphone device. Following that, select “Continue running when on battery saver” and click on the “Apply” button.

2. Configure Microphone Settings from Control Panel (4)

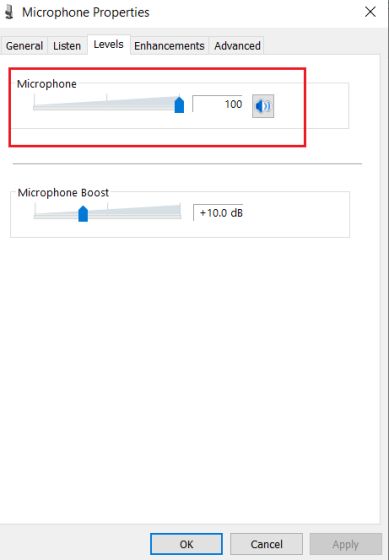
5. Now, switch to the “Levels” tab and ensure the “Microphone Level” is close to 100.

2. Configure Microphone Settings from Control Panel (5)

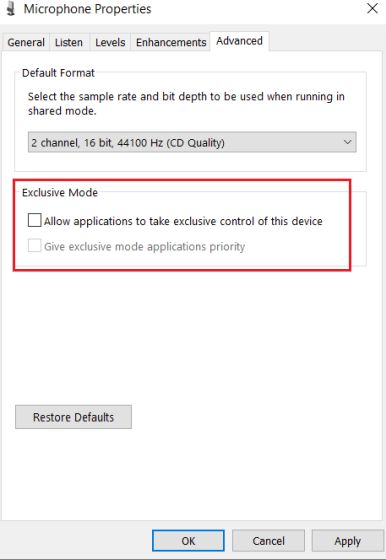
6. Having done that, move to the final “Advanced” tab and uncheck both the boxes under the “Exclusive mode” section. Finally, apply the changes and click on the “Ok” button. Now, restart your Windows 10 PC and you should have a working microphone this time.

2. Configure Microphone Settings from Control Panel (6)

3. Adjust Game Bar Settings

If you are unable to record your audio while playing games in Windows 10 then this method will help you fix microphone issues in Windows 10. Here is how to go about it.

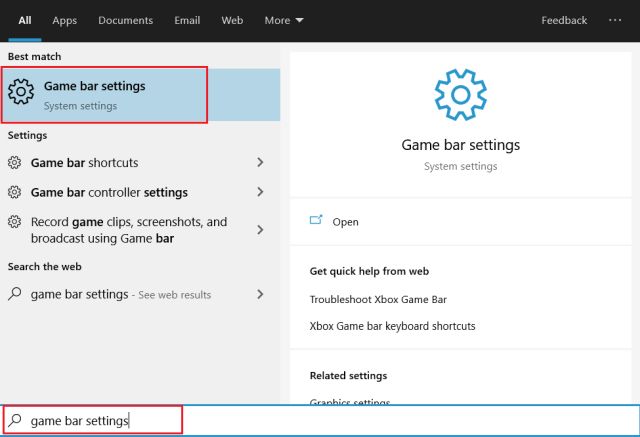
1. Press the “Windows” key again and type “game bar settings”. Now, click on the top result.

3. Adjust Game Bar Settings

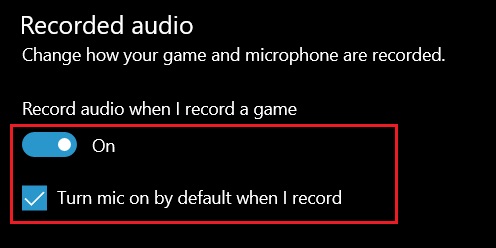
2. Next, switch to the “Captures” tab on the left side and scroll down to “Recorded audio”. Here, enable the toggle and check the box located below. These changes will allow you to record audio while you are playing a game.

3. Adjust Game Bar Settings (2) Fix Microphone Issues on Windows 10

4. Update Audio Driver

If everything fails then it might be the audio driver which has become incompatible with the operating system and hardware device. To fix microphone bug in Windows 10, we need to update the drives as our last resort.

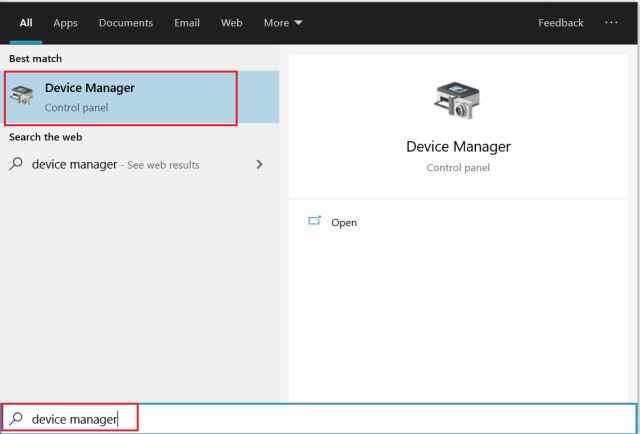
1. Type “Device Manager” in the Windows search box and open the top result.

4. Update Audio Driver

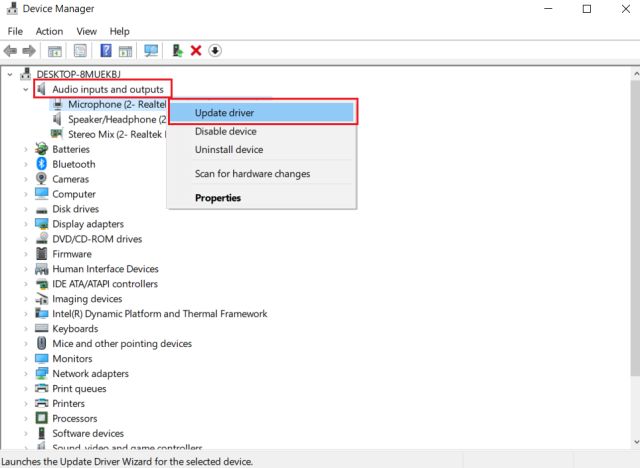
2. Here, double-click on “Audio inputs and outputs” and the menu will expand. Now, right-click on “Microphone” and select “Update Driver”.

4. Update Audio Driver (2)

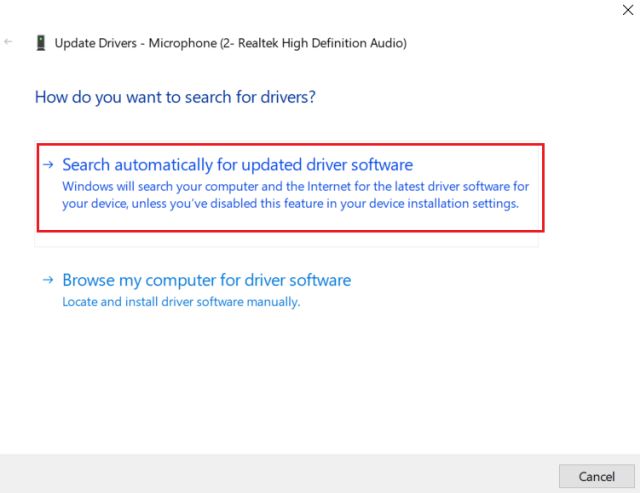
3. On the next window, click on “Search automatically” and it will check for the latest audio driver from the internet. So, make sure you are connected online. After that, restart your PC and hopefully this time the microphone bug goes away on your Windows 10 PC. In case, the microphone is still not working then in all probability, it’s physically damaged. That means you will either have to use an external microphone or take your device to a service center to get repaired.

4. Update Audio Driver (3) Solve Microphone Bug in Windows 10

SEE ALSO: How to Speed up Windows 10 in 2019 [Effective Methods]

Fix Microphone Issues in Windows 10 in Four Easy Ways

So that was our short article on how to resolve microphone issues in Windows 10. We have included some general and advanced steps to fix the issue. Most of the time, the microphone does not work because some other app keeps blocking the access. So, follow the first method step by step and it should fix most of the issues. Anyway, that is all from us. If you found the article helpful, do let us know in the comment section below.

How to Reply to Messages from Windows 10 [Supports WhatsApp]

$
0
0

How to Reply to Text Messages From Windows PC

Microsoft is bringing some awesome changes to Windows 10 which allow you to respond to all sorts of messages from your PC. A few weeks ago, we reported that this feature is part of Windows Insider previews, but now it has been released for the stable build. If you are using the latest stable build of Windows 10, you can reply to messages from your Windows PC seamlessly. Further, you can also manage your photos and notifications without any issues. Now having said that, let’s go through the steps.

Reply to Messages and Access Image Gallery on Your PC

Before we begin the article, make sure you are running the latest build of Windows 10. Also, your smartphone must be on Android 7 (Nougat) or above version. With that said, here are the steps to follow.

Note: As of now, this feature is only available on Android.

1. First of all, download and install Your Companion app (Free) from the Play Store on your Android device. After that, log in with your Microsoft account.

Reply to Text Messages and Access Image Gallery on Your PC

2. Next, the app will ask for a few permissions. Grant those and you are all set for the next step.

How to Reply to Text Messages From Windows PC

3. Now come back to your PC, and press the Windows key once and type “your phone” in the search box. After that, open the first result.

Reply to Text Messages and Access Image Gallery on Your PC 2

4. Here, click on “Sign in with Microsoft” button and add the same Microsoft account that you used on your Android device.

Reply to Text Messages and Access Image Gallery on Your PC 3

5. Finally, you will be greeted with the main dashboard. You can access all the text messages on the left pane. Further, you can reply and compose new messages too and it works seamlessly.

Reply to Text Messages and Access Image Gallery on Your PC 7

6. You can even reply to WhatsApp messages from the Notification Center without using WhatsApp Web and that is awesome.

Reply to Text Messages and Access Image Gallery on Your PC 6

6. Lastly, you can access your photos and notifications which surprisingly works really well.

Reply to Text Messages and Access Image Gallery on Your PC 5

SEE ALSO: How to Install and Use the New Windows 10 Terminal App

Manage Your Android Device on Windows 10 Seamlessly

So that was our short article on how to reply to messages straight from your Windows PC. I love the new changes Microsoft is making to unify the PC-smartphone experience. In my testing, the setup was really seamless and I was able to set up everything within minutes. You should definitely try this feature, it’s really convenient. Anyway, that is all from us. If you are facing any sort of problems while setting it up, do comment down below and let us know. We will definitely try to help you out.

Windows 10X Explained: Everything You Need to Know

$
0
0

Windows 10X Everything You Need to Know

In a surprising turn of events, Microsoft launched a series of hardware devices at the Surface event in New York which were not expected. But what stood out the most was the Surface Neo and the software it was running. Surface Neo is a dual-screen, foldable device which is running Windows 10X, a new operating system by Microsoft. So, if you are wondering, if this is the new operating system that will eventually replace Windows 10, you can’t be more wrong. In this article, I explain what is Windows 10X and who it’s meant for in a comprehensive manner. With that said, let’s begin the article.

What Exactly is Windows 10X?

Many Windows users have been waiting for a mobile version of Windows 10, but sadly, Windows 10X is not that. Windows 10X is another variant (code-named Santoni) of Windows 10, just like the Windows 10S. However, it’s primarily built for foldable and dual-screen devices like the Surface Neo. It comes with many optimizations to make Windows apps more modular and easy to use on a flexible screen. For what it’s worth, Windows 10X is very much a desktop-like operating system, but with mobility and convenience in mind.

What Exactly is Windows 10X

What are the New Features?

While Microsoft unveiled Windows 10X at a public event, they didn’t spill the beans altogether. At present, details regarding core architecture and software are still under the wraps, but we can reach certain conclusions from yesterday’s media briefing.

Starting with the UI design, Windows 10X no longer has a start menu instead it features a launcher with no live tiles or animation. The taskbar apps are centered and I think it looks much better for a mobile-first device. Further, in terms of OS update handling, Windows 10X comes with a seamless update mechanism that works way better than Windows 10’s current update system.

What are the New Features

Other than that, it has a few features up its sleeves to make the foldable experience convenient and more accessible. For instance, if you invoke an app on one side of the screen, the app opens up on that particular side. However, if you want to leverage the second screen as well, you can just move the app to the center and the application will span to both the screens. Microsoft calls this feature “Spanning” and it works pretty well.

What are the Features of Windows 10X 2

Another feature worth mentioning is “Wunderbar”. If you choose to use a keyboard, Windows 10X will detect it and switch the second screen to Wunderbar mode. It’s very much like the touch bar on Mac, but there is ample space to watch videos, open another app or use the second screen as your touchpad. So these are the two features unique to Windows 10X, but both are still under development. It will be left to be seen, what further changes Microsoft brings next year to make the experience even more seamless on foldable devices.

What are the New Features

The Billion Dollar Question: What Apps Does Windows 10X Support?

In the launch event, Microsoft quipped that Windows 10X supports “the breadth of Windows applications” including Microsoft Office, Web apps, and PWAs. Make of it what you will, but Windows 10X can only run UWP (Universal Windows Apps) apps natively and Win32 applications in a container. If you don’t know what a container is, let me briefly explain the difference. Native apps are tightly integrated with the operating system so they perform much better without hogging crucial resources. Whereas, containers use a subsystem, in this case, a framework of Windows 10 with essential components for running a Win32 app. So basically, Win32 apps will run in a subsystem that is not optimized or deeply integrated with Windows 10X.

The Billion Dollar Question What Apps Does Windows 10X Support

To break it down in simple language, Microsoft Office, Chromium Edge and other apps that use the older Windows API will run in a container. Microsoft has claimed that the performance will be on par with UWP apps but we will only get to know when it will be launched next year.

When will it Release?

Microsoft announced that Windows 10X will be available next year during Christmas. However, we might see insider builds mid-next year for public testing. Before that, Microsoft is engaging with Windows developers around the world to create applications, especially for the Windows 10X platform. Further, Microsoft is also partnering with many hardware giants including HP, Asus, Dell and Lenovo who will release foldable devices powered by Windows 10X during Fall, next year.

Will Windows 10 Users Get the Update?

As I discussed above, Windows 10X is entirely a new product category which is mainly designed for foldable devices. So, if you are running a Windows 10 PC, you won’t get the update. However, keep in mind, Windows 10X is based on Intel’s architecture, so at some point, it might run on normal PCs.

SEE ALSO: How to Reply to Messages from Windows 10 [Supports WhatsApp

Are You Ready for This New Windows Version?

While Windows 10X may seem just another variant of Windows 10, it can be a game-changer for Microsoft. After losing out on smartphones, the software giant doesn’t want to miss the train to the foldable world. With the launch of Surface Neo and Windows 10X, Microsoft has surely made a dent in both hardware and software space. Now, we have to wait for another year to see what improvements Microsoft brings to the foldable space. So, are you excited about Windows 10X? Do let us know in the comment section below.

How to Access the New File Explorer Interface on Windows 10

$
0
0

How to Access the New File Explorer Interface on Windows 10

Windows has had the same File Explorer interface for ages with little to no change in terms of appearance and file handling. However, a Redditor has discovered a hidden File Explorer on Windows 10 which is based on the newer UWP (Universal Windows Platform) standards. The new interface looks quite modern and consistently fluent in design language. It no longer looks legacy by any means and I absolutely love this new look. So, if you want to try out the new File Explorer on Windows 10 then follow the steps below.

UWP-based File Explorer Based on Windows 10

The steps are quite straightforward so it won’t take much time to access it. However, keep in mind, the new File Explorer is still in development so there might be some bugs. Also, some of the popular features like Pin to Quick Access or List View is not available right now. Having said that, now let’s begin.

Note: I tested the new File Explorer on both Windows 10 1903 and Insider build and it worked pretty well. So, if you want to try it out, make sure you are on the latest version of Windows 10.

1. All you have to do is copy the command below and paste it on any File Explorer window. After that, hit enter and you will be into the new explorer window.

shell:AppsFolder\c5e2524a-ea46-4f67-841f-6a9465d9d515_cw5n1h2txyewy!App

UWP-based File Explorer Based on Windows 10

2. Here is the new File Explorer in action.

UWP-based File Explorer Based on Windows 10 2

3. If you want to use it regularly then you can simply pin the new File Explorer on your taskbar.

UWP-based File Explorer Based on Windows 10 3

SEE ALSO: Latest Windows Insider Build Brings Calling Support to Your Phone App

Do You Like the New File Explorer on Windows 10?

So that was our quick look into the new File Explorer on Windows 10. We have been waiting for a File Explorer redesign for years and finally, we got a sneak peek of what is coming in the future. As I mentioned above, if you like the new interface, you can just pin the app in your taskbar and you can access it directly. Anyway, that is all from us. But what about you? Do you like the new changes? Comment down below and let us know.

How to Center Taskbar Icons on Windows 10

$
0
0

How to Center Taskbar Icons on Windows 10

While Windows 10 allows customization to a great degree, it has not tried to experiment with its core features like Start Menu and Taskbar. Both these UI elements are left-aligned and have been sitting in a corner for close to two decades. However, macOS and Chrome OS have their app dock centered and I feel it’s much more utilitarian and symmetrical in its overall theme. So, if you also want to move the Taskbar icons to the center, you have come to the right place. In this article, I will show you how to center Taskbar icons with a very simple app. The best part is that it does not require fiddling with the core system so you won’t break anything. With that said, let’s begin.

Center Taskbar Icons on Windows 10

We are going to use an app called FalconX which is developed by ‪Chris Andriessen‬. It’s a fantastic app and requires no heavy installation. You just have to run the program and there you have it. Now having said that, here are the steps to follow so there’s no room for confusion.

1. Download the FalconX ZIP file from here. It’s available for free, but if you want to support the developer, you can install the paid version from Microsoft Store ($1.09).

2. Next, extract the zip file and open the folder. Here, double-click on “FalconX” to run the program. Windows might block the installation so click on “More Info” and then click on “Run Anyway”.

Center Taskbar Icons on Windows 10

3. All your Taskbar icons will move to the center in a zippy and the best part is that it does not feel like a third-party solution. The animations are really cool and feel very native to the system.

Center Taskbar Icons on Windows 10 2

4. If you are looking to configure the app, you can find it in the system tray. You can try out different animations and also allow the app to run on startup. The FalconX app also supports multiple screens up to 3 monitors.

Center Taskbar Icons on Windows 10 3

SEE ALSO: How to Access the New File Explorer Interface on Windows 10

Make the Windows Taskbar Icons Centered

So that was our short guide on how to make the Taskbar icons centered. Many Windows users have been asking for a native way to achieve it, but this third-party application almost feels baked into the system. Not to mention, support for 42 different animations is absolutely great. Anyway, that is all from us. If you found the article helpful, do comment down below and let us know.

How to Fix Error 0x80246019 on Windows 10

$
0
0

How to Fix Error 0x80246019 on Windows 10

Microsoft unveiled its in-house app marketplace Microsoft Store with the release of Windows 10. However, it has been facing many issues ranging from failed downloads to incomprehensible error messages being thrown while updating apps. Recently, users complained that they are unable to download apps and games from Microsoft Store. It downloads apps but then throws error 0x80246019 while installing them. So, in this article, I will show you how you can fix error 0x80246019 on Windows 10 with just two simple steps.

Resolve Error 0x80246019 on Windows 10

We will use the Powershell command shell to restore many Windows settings including Microsoft Store and other apps. Rest assured, the process will not erase any of your personal data. Now without any delay, let’s go through the steps.

1. First of all, search for “Powershell” from Windows Start Menu. Now, right-click on “Windows Powershell” and click on “Run as administrator”.

Resolve Error 0x80246019 on Windows 10

2. After that, execute the following command on the Powershell window. It will ask for further permission, type “y” and hit enter. The permission will allow us to make changes to the execution policy without any restrictions.

Set-ExecutionPolicy Unrestricted

Resolve Error 0x80246019 on Windows 10 2

3. Having done that, perform the following command on Powershell again. It will start restoring all the apps to their default settings and disable any third-party intervention.

Get-AppXPackage -AllUsers | Foreach {Add-AppxPackage -DisableDevelopmentMode -Register "$($_.InstallLocation)\AppXManifest.xml"}

Resolve Error 0x80246019 on Windows 10 3

4. After the process is over, restart your PC and you should have error 0x80246019 resolved by now. Go ahead and download apps and games from the Microsoft Store without any issues.

SEE ALSO: How to Speed up Windows 10 in 2019 [Effective Methods]

Fix Microsoft Store with Two Simple Steps

So that was our quick guide on how to fix error 0x80246019 on Windows 10. Many users have been complaining about this issue for far too long, but it was compounded recently when they were unable to install games on Windows 10 PC. Anyway, you can just go ahead and restore the default settings with these two commands and everything will fall in place. So that is all from us. If you are still facing issues then comment down below and let us know. We will definitely try to help you out.


How to Schedule Automatic Dark and Light Mode on Windows 10

$
0
0

How to Automatically Switch Between Dark and Light Mode on Windows 10

While tech giants are bringing dark mode left, right, and center, they are leaving a crucial feature behind. Microsoft brought the dark theme on Windows 10 last year, but still, we can’t schedule theme switching. Similar is the case with Google which rolled out system-wide dark mode on Android 10 but without any scheduling feature. We have already covered how to schedule dark mode on Android 10. So, in this article, we are going to cover how to schedule theme and automatically switch between dark and light mode on Windows 10. The process is quite simple and straightforward so no worries there. Now having said that, let’s jump right in.

Automatically Switch Between Dark and Light Mode on Windows 10

There is a popular method to schedule dark mode using Task Scheduler on Windows 10. However, the process is quite complex and can be tough for a layman to set it up correctly. So, we have brought a straightforward way to schedule dark mode on Windows 10 with a simple app. That said, let’s go through the easier method first and then we will show you how to set it up manually.

  • Schedule Automatic Dark and Light Mode on Windows 10 with a Simple App

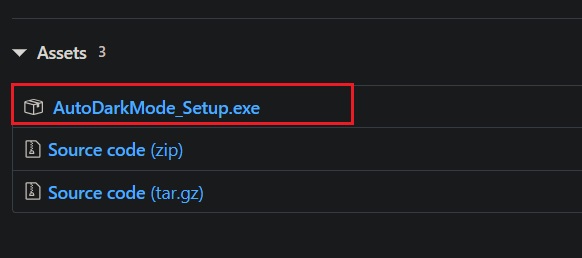
1. We are going to use a free application called Auto Dark Mode which is developed by Armin Osaj. Open this link and download the latest version of Auto Dark Mode. After that, run the app and install it on your PC.

Schedule Automatic Dark and Light Mode on Windows 10 with a Simple App

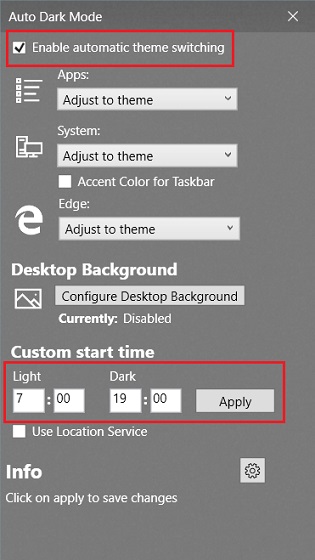
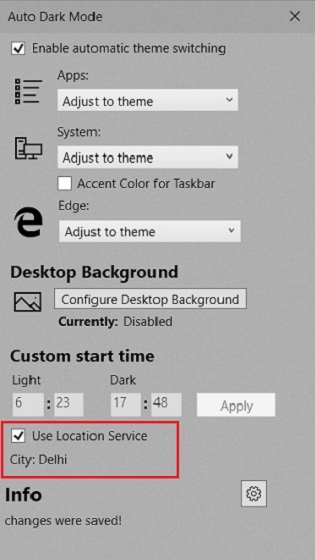
2. Next, open Auto Dark Mode and click on “Enable automatic theme switching” on top. Following that, enter your preferred time for both light and dark mode and then click on the “Apply” button. Keep in mind, the app only supports 24-hour clock so enter your input in that particular format. Now you are done and theme switching should work flawlessly.

Schedule Automatic Dark and Light Mode on Windows 10 with a Simple App 2

3. In case you want Windows 10 to automatically switch between dark and light mode based on your local sunrise and sunset time then you can enable the toggle for “location service”. It will search for your location and set the theme accordingly.

Schedule Automatic Dark and Light Mode on Windows 10 with a Simple App 3

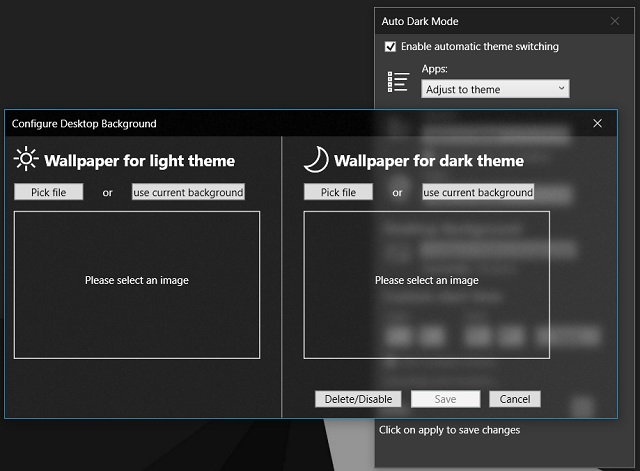
4. Further, you can also set custom desktop backgrounds for both dark and light mode. Tap on “Configure Background” and pick your image file. You can go ahead and also tinker with other settings based on your preference.

Schedule Automatic Dark and Light Mode on Windows 10 with a Simple App 4

  • Set Dark and Light Mode on Windows 10 using Task Scheduler

While Auto Dark Mode can switch themes in just a few clicks, I am primarily showing the manual steps so that you can learn how to automate tasks on Windows 10. It could help you automate other routine tasks on your PC. Apart from that, I have explained the steps for switching from light to dark mode only, but you can repeat the same steps for light mode too. I have provided detailed instructions so there is nothing to worry about. Having said that, here are the steps to follow.

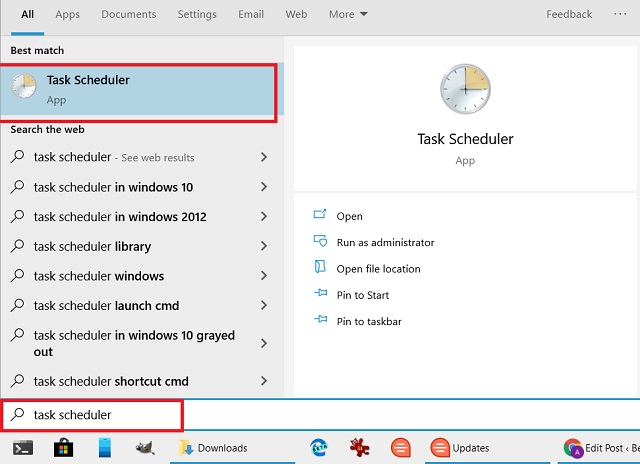
1. Press the Windows key once and type “Task Scheduler”. Open the first result and a new window will open up.

Schedule Dark and Light Mode on Windows 10 using Task Scheduler

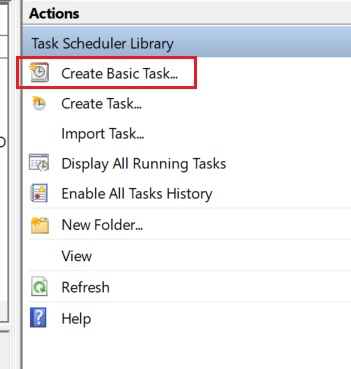
2. Click on “Create Basic Task” on the right pane.

Schedule Dark and Light Mode on Windows 10 using Task Scheduler 2

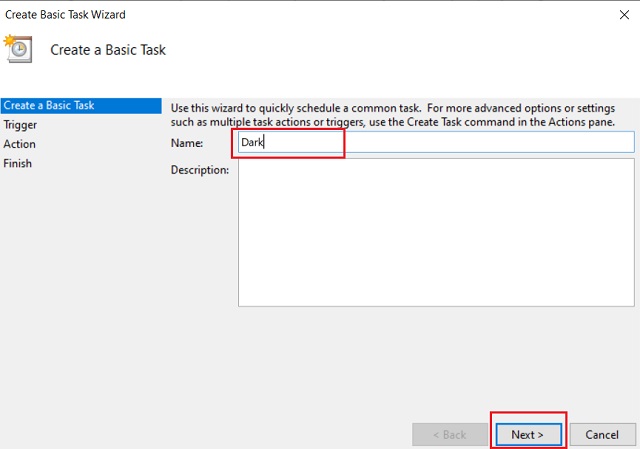
3. Now give a name to the task. I have entered “Dark” as I want to change the theme from light to dark. After that, click on the “Next” button. Keep in mind, you will have to create a separate task for light mode just like this.

Schedule Dark and Light Mode on Windows 10 using Task Scheduler 8

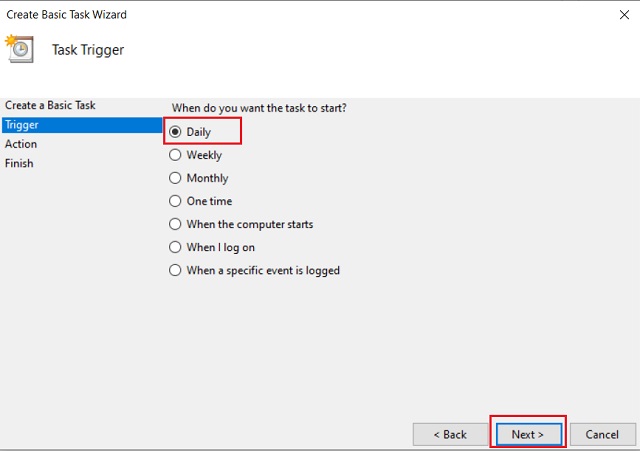
4. Here, select “Daily” and then move forward.

Schedule Dark and Light Mode on Windows 10 using Task Scheduler 3

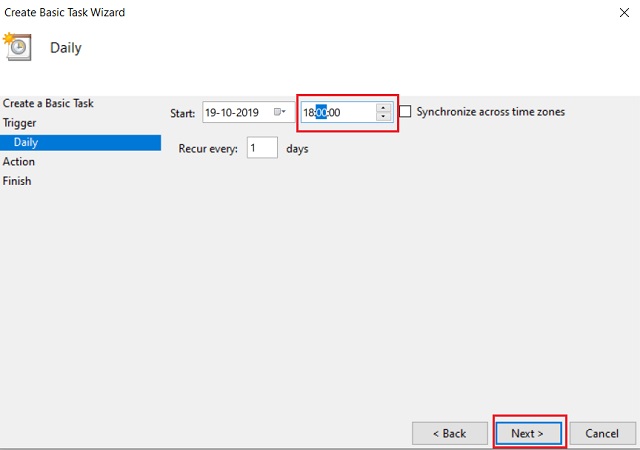
5. After that, set the time when you want Windows 10 to switch to dark mode. Do note, it’s a 24-hour clock so provide the data in the same format. Now, click on the “Next” button.

Schedule Dark and Light Mode on Windows 10 using Task Scheduler 4

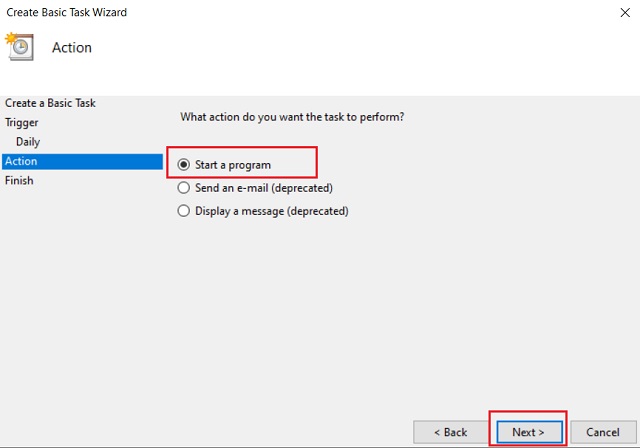
6. On the next page, select “Start a program” and then move ahead.

Schedule Dark and Light Mode on Windows 10 using Task Scheduler 5

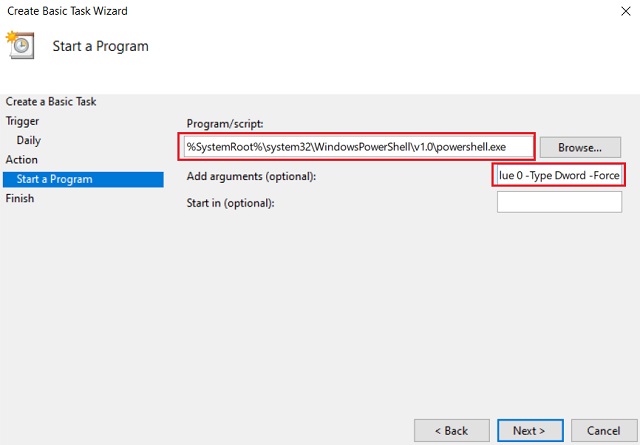
7. Finally, paste the below commands in their respective fields. Reminding again, it’s for switching from light to dark mode. After that, click on the “Next” button.

Program / Script:

%SystemRoot%\system32\WindowsPowerShell\v1.0\powershell.exe

Add arguments (optional):

New-ItemProperty -Path HKCU:\SOFTWARE\Microsoft\Windows\CurrentVersion\Themes\Personalize -Name SystemUsesLightTheme -Value 0 -Type Dword -Force; New-ItemProperty -Path HKCU:\SOFTWARE\Microsoft\Windows\CurrentVersion\Themes\Personalize -Name AppsUseLightTheme -Value 0 -Type Dword -Force

Schedule Dark and Light Mode on Windows 10 using Task Scheduler 6

9. Similarly, for switching from dark to light mode, paste the below commands and click on “Next”.

Program / Script:

%SystemRoot%\system32\WindowsPowerShell\v1.0\powershell.exe

Add arguments (optional):

New-ItemProperty -Path HKCU:\SOFTWARE\Microsoft\Windows\CurrentVersion\Themes\Personalize -Name SystemUsesLightTheme -Value 1 -Type Dword -Force; New-ItemProperty -Path HKCU:\SOFTWARE\Microsoft\Windows\CurrentVersion\Themes\Personalize -Name AppsUseLightTheme -Value 1 -Type Dword -Force

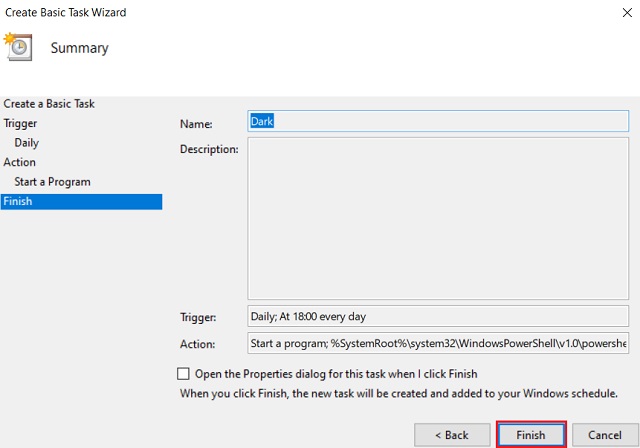
10. Now, it will show the final window with task and schedule details. Click on the “Finish” button and you are done. The task should run at the scheduled time and it will run a Powershell window for a split second. For light mode, repeat the same process but with different commands mentioned above.

Schedule Dark and Light Mode on Windows 10 using Task Scheduler 7

SEE ALSO: How to Center Taskbar Icons on Windows 10

Experience Both Dark and Light Mode on Windows 10

So that was our guide on how to automatically switch between Dark and Light mode on Windows 10. We have shared two different methods so depending on how much control you want over scheduling, you can choose the process. I would say, if you want a simple solution, just go with Auto Dark Mode app. Anyway, that is all from us. If you liked our guide, do let us know in the comment section below.

How to Transfer Windows 10 License to a New Computer

$
0
0

How to Transfer a Windows 10 License to a New Computer

The best part about Windows 10 is that you can transfer the license key to another computer in case you are upgrading your machine or moving to a new computer. It saves you from spending big dollars and that is really great on Microsoft’s part. So, in this article, we are going to show you how to transfer a Windows 10 license to a new computer. We have shared two simple methods so you can move to a new PC without much friction. In addition, we have also explained some specific details which will help you find whether your license key is transferrable or not. Now having said that, let’s start the article without further delay.

Is Your Windows 10 License Transferrable?

You can only transfer a Windows 10 license if you have a Retail key– either purchased from a store or online portal (a digital copy). You can check the type of product key by following these steps. Press Windows and R keys at once and type “cmd”. Here, type slmgr -dli and hit enter. A dialog box will appear with the description of the product key. If it shows retail then you are good to go. However, if it shows OEM then sadly, you can’t transfer the license to another computer.

Is Your Windows 10 License Transferrable

Apart from that, you must ensure the same edition of Windows 10 is installed on both the computers. For example, if you have an activated Windows 10 Home PC then you can only transfer the license to another Windows 10 Home PC.

Also, if you are swapping a new hard disk on an old laptop or PC then you don’t have to do anything. Just do a fresh installation of Windows 10 and the OS will automatically pick the product key since the license is tied to the motherboard. You just have to choose the correct edition during the installation. Having said that, if it asks for a product key during the process, simply choose “I don’t have a product key” and proceed with the installation. Later, Windows 10 will automatically activate itself after connecting to Microsoft servers.

So those are some key points to keep in mind before transferring a Windows 10 license. If you fulfill these criteria, you can go ahead and move to a new PC with your license intact.

1. Transfer Windows 10 License Key

1. First and foremost, open the start menu and search for “cmd”. Now, click on “Run as administrator” in the sub-section.

1. Transfer a Windows 10 License

2. After that, type the following command and hit enter to de-register the product key from your old computer.

smlgr.vbs /upk

1. Transfer a Windows 10 License 2

3. Now, execute another command to remove the product key from Windows Registry.

smlgr.vbs /cpky

1. Transfer Windows 10

  • Re-activate Windows 10 License on New Machine

1. You have successfully removed the Windows 10 license from your old computer. Now, move to your new computer and open Command Prompt in a similar fashion as described in the above section.

2. Replace “xxxxx-xxxxx-xxxxx-xxxxx-xxxxx” with your actual product key and execute the below command. Voila, you have successfully transferred your Windows 10 license to a new system.

slmgr.vbs /ipk xxxxx-xxxxx-xxxxx-xxxxx-xxxxx

1. Transfer a Windows 10 License 4

3. Alternatively, you can follow this path to activate the new computer: Start Menu -> Settings -> Update & security -> Activation -> Change the product key. Here, enter the license key and you are done.

Re-activate Windows 10

4. If the new machine is still not activated then you can call Microsoft Support to manually transfer the license key. To do so, press Windows and R keys at once and a small Run window will appear at the left corner. Now type the below command and hit enter.

slui.exe 4

Re-activate Windows 10 License on New Machine 2

5. An activation wizard window will open up. Here, select your country and click on the “Next” button.

Re-activate Windows 10

6. You will find the toll free number of Microsoft Support. Call them and provide your Installation ID as shown on the screen. Following that, you will get a confirmation ID from Microsoft Support.

Re-activate Windows 10

7. Click on the “Enter Confirmation ID” button and fill in the details. Now, click on the “Activate Windows” button and finally your new PC will be activated.

Re-activate Windows 10 License on New Machine 5

2. Transfer a Windows 10 License with Microsoft Account

If you hold a retail-digital license of Windows 10 then moving to a new system is even easier. Follow these steps below to seamlessly activate your new computer.

1. On your old computer, open Settings -> Accounts -> Your Info and click on “Sign in with a Microsoft Account Instead”. Now, enter your account credentials and link the PC to your Microsoft account.

2. Microsoft Account

2. After that, open Settings -> Update & security -> Activation and check if it’s showing “Windows is activated with a digital license linked to your Microsoft account”. If so, you are good to go.

2. Transfer a Windows 10 License with Microsoft Account 2

3. Now, move back to your new computer and sign in with the same Microsoft account. After that, open Settings -> Update & security -> Activation and you will find your new system is activated.

2. Microsoft Account 3

SEE ALSO: How to Legally Get Windows 10 Key for Free or Cheap in 2019

Save Money by Transferring Windows 10 License Key

So those are the two ways you can transfer a Windows 10 license to another computer. Both methods are quite simple and straightforward so you can easily get a licensed copy without spending extra bucks. I have also shared some alternate ways to re-activate Windows 10 on the new computer in case you face any problem. Having said that, if you are still unable to transfer your Windows 10 license then comment down below and let us know. We will surely try to help you out.

How to Open HEIC, HEIF and HEVC Files on Windows 10 For Free

$
0
0

How to Open HEIC, HEIF and HEVC Files on Windows 10 For Free

Ever since Apple embraced HEIF as their new file format for images and videos, multiple tech companies including Microsoft and Google started working on it to maintain compatibility on their platform. It’s claimed that a HEIF image can store the same information as a JPEG image in half the amount of memory space. iPhones are already taking advantage of the new file format, but if you use a Windows PC to import HEIF photos then you can’t access those files in a straightforward manner. So, in this article, I have shared some easy ways to open HEIC, HEIF and HEVC files on Windows 10 and without much hassle. Now having said that, let’s go ahead and learn about the steps in detail.

Enable Support for HEIC, HEIF and HEVC Files on Windows 10

Before we begin, let me clarify some key points. HEIC and HEIF are image file formats and are almost similar. Technically, there are some differences, but for general consumers, it’s almost the same thing so don’t worry if you encounter a slightly different file extension. On the other hand, HEVC is a video compression standard and not a file format. So, mostly you will find images with HEIC or HEIF file extension and videos with MKV format but compressed with HEVC standard. As a side note, all these file formats are developed by the MPEG Group and not Apple, as is the popular misconception.

Now, coming back to Windows 10. If you open a HEIF image on Windows 10, it will ask you to install an additional codec and will take you to the Microsoft Store. It will ask you to pay $0.99 for installing the additional codec and I don’t know why.

Enable Support for HEIC, HEIF and HEVC Files on Windows 10

Nevertheless, Microsoft is also offering another extension that does the same thing and it’s surprisingly free. So, in this article, I am going to show you how to install that particular codec so you can play HEIC, HEIF or HEVC files without paying a dime. That being said, let’s get started.

  • Steps to Enable HEIC, HEIF and HEVC Support on Windows 10

1. First of all, open this link and install “HEVC Video Extensions from Device Manufacturer” from Microsoft Store. You can also manually search for it on the Microsoft Store, but make sure to include “Device Manufacturer” in your search query.

Enable Support for HEIC, HEIF and HEVC Files on Windows 10

2. After that, open this link and make sure “HEIF Image Extensions” is installed. After April 2018 Update, Microsoft started installing this extension by default. However, if you are still on older builds, this link should help.

Enable Support

3. Now, go back to your media folder and you will be able to play HEIC, HEIF and HEVC files without a hitch. The files will also start showing thumbnails properly. Click to view slideshow.


4. In case, you are still facing any problem, open Windows Settings and then open the “Apps” menu. Now, scroll down and look for “HEVC Video Extension..” and “HEIF Image Extension”. Click on both the apps and open “Advanced Options”.

Enable Support for HEIC, HEIF and HEVC Files on Windows 10 4

5. Now, scroll down and click on the “Reset” button. That’s it. Now, the HEIF media files should display properly.

Enable Support

Open HEIF, HEIC and HEVC Files on Windows 10 for Free

So that was our guide on how to enable support for HEIF and related file formats on Windows 10. While Microsoft did start enabling the support by default in April last year, they may have run into licensing issues with the MPEG group. Hence, the asking price for the additional codec. Thankfully, there is a workaround and you can get it for free. Anyway, that is all from us. If you found the article helpful, comment down below and let us know.

How to Delete WinSxS Folder on Windows 10

$
0
0

How to Delete WinSxS Folder on Windows 10

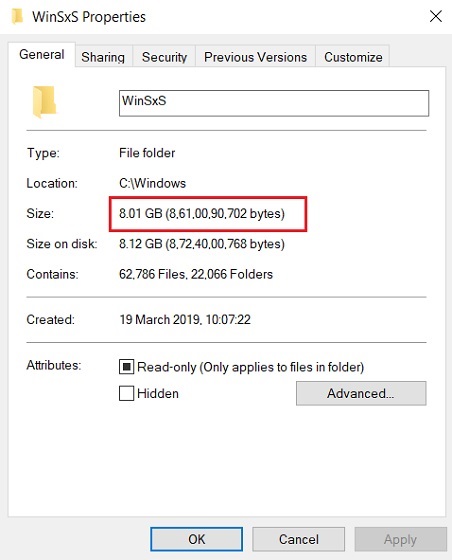
Users who have been using Windows 10 for years are well aware that the available disk space of the OS drive reduces over time for no apparent reason. It becomes even worse if you are using your computer for a longer time without any maintenance. The culprit that you are looking for is the WinSxS folder sitting inside the OS drive. Microsoft calls it “Windows Side By Side” or loosely the component store. The folder contains all sorts of system files that are used to fix various issues on your Windows PC. However, the folder size keeps eating the crucial space and that is the pain point of most users. So in this article, I will share an easy way to delete the WinSxS folder without affecting your PC’s stability. Now having said that, let’s get started.

What Exactly is WinSxS Folder?

Before moving forward, let’s go through some crucial points. First of all, you can’t delete the WinSxS Folder entirely, but you can definitely reduce its size. The reason is that the WinSxS folder contains many important libraries and components of the operating system which are required to resolve OS related issues. So, in a way, one should not touch the WinSxS folder as it’s there to keep our PC safe and sound.

However, the point is that the WinSxS folder keeps getting larger over time and if you are using a machine for years then the folder would take around 40% of your OS drive which is completely insane. So, what exactly is happening in that folder? Actually, besides OS components, Windows also keeps update files in the WinSxS folder. So, whenever you get a new update, files are downloaded and stored in case you encounter an issue in the future and want to roll back to an earlier build. Basically, every time you get an update, the files are accumulated in that folder resulting in an incredibly higher size of the OS drive.

What Exactly is WinSxS Folder

It would be wrong to say that Microsoft didn’t try to fix the issue. Currently, Windows 10 comes with an automated maintenance service that cleans up files that have been superseded after a month. However, users report that it does not work as intended so there is that. Anyway, now that we have understood the issue at hand, we will go through the steps to reduce the size of the folder in a way it does not hamper your system’s stability.

Steps to Clean Up WinSxS Folder

We will go through a two-step process to complete this task. First, we will use an internal tool and then move to a manual cleanup method. Now having said that, let’s begin.

  • Reduce Folder Size Using the DISM Tool

We are going to use the DISM Tool (Deployment Image Servicing and Management) to clean up the folder. DISM tool is used to keep the Windows image intact and prepare for recovery environments.

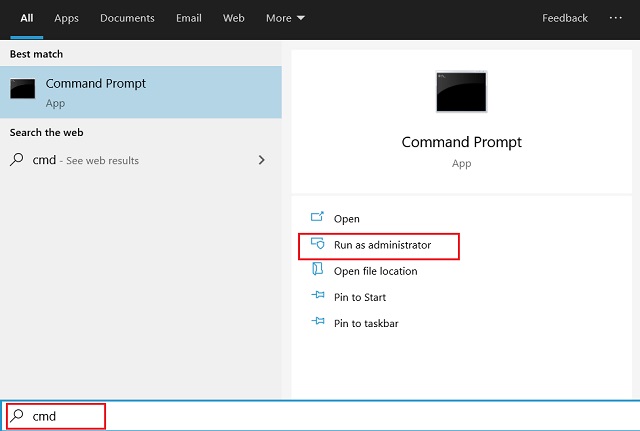
1. Press Windows key once and type “cmd” in the search box. After that, click on “Run as Administrator” in the sub-menu.

Folder 3

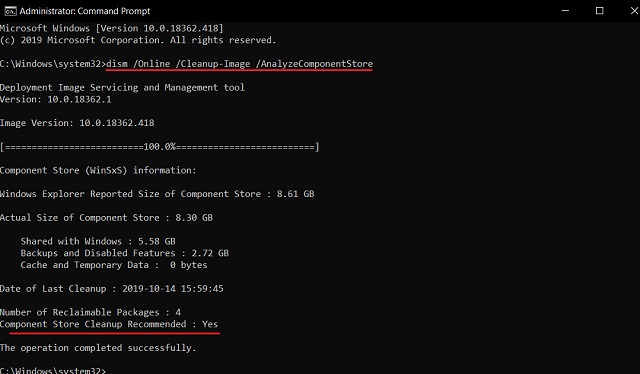
2. Once the Command Prompt window is open, execute the below command to check if redundant files are available in the folder. If it says cleanup recommended at the bottom then move to the next step.

dism /Online /Cleanup-Image /AnalyzeComponentStore

Steps to Clean Up WinSxS Folder

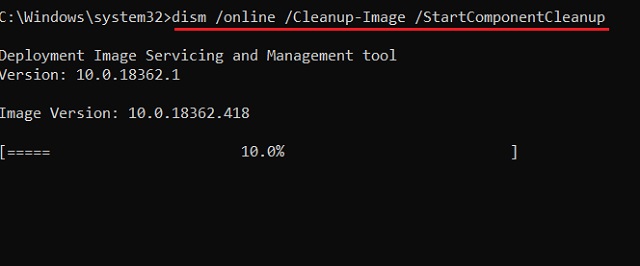
3. Now, execute the second command to finally start the cleanup process. After the process is completed, you are done. The WinSxS folder should free up considerably.

Note: The process may take some time so keep patience.

dism /online /Cleanup-Image /StartComponentCleanup

Folder 2

  • Delete Update Files Using Disk Cleanup

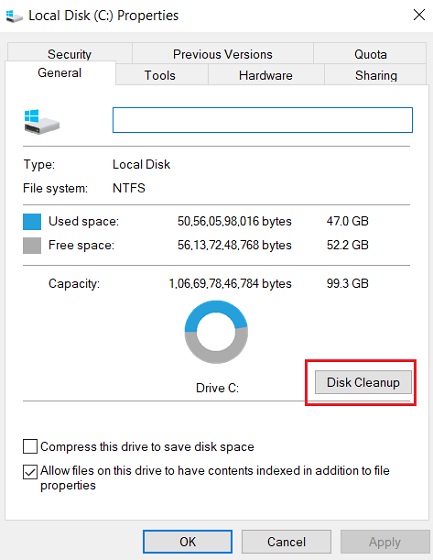
1. Right-click on the OS drive (generally, C drive) and open “Properties”. Here, click on “Disk Cleanup”.

Delete Update Files from WinSxS Folder Using Disk Cleanup

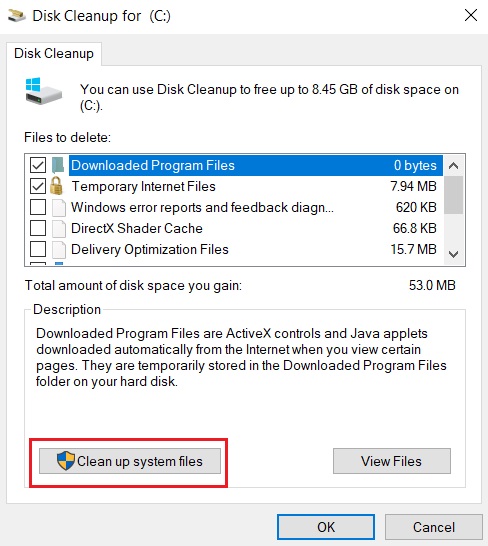
2. Next, click on the “Clean up system files” button at the bottom-left.

Using Disk Cleanup 2

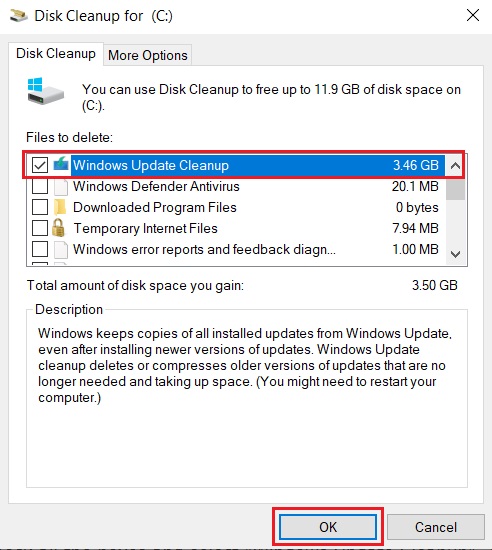
3. Now, uncheck all the boxes and select “Windows Update Cleanup” at the top. After that, click on the “OK” button. Voila, a huge amount of update files in the WinSxS folder will be deleted instantly. Now, restart your PC and you will find the OS drive taking less space.

Delete Update Files from WinSxS Folder Using Disk Cleanup 3

This should sufficiently release storage on your Windows machine and make it faster. One thing to note here is that sometimes if the PC is too old, it’s better to just reset Windows 10 to get a clean start. Do remember to take a backup of your Windows 10 PC before you go through the resetting process.

Delete WinSxS Folder and Regain Space

So that was our guide on how to delete the WinSxS folder and free up the OS drive. The reason Windows slows down after years of usage is because of these files clogging the crucial memory space. So, if you want to speed up your computer, reducing the WinSxS folder would also make a huge difference in performance. Anyway, that is all from us. If you want to learn more about Windows 10 then do comment down below and let us know.

How to Automate Tasks on Windows 10 to Save Time

$
0
0

How to Automate Tasks on Windows 10 to Save Time (2)

In a world of smart technology, we are missing out on a bunch of things if we are not doing automation right. Android has the Tasker app for automation that is now getting a new Rules feature; iOS already has a powerful Shortcuts app to automate a multitude of tasks and more. But those are smartphones, what about PCs? Well, Windows 10 has a similar tool called Task Scheduler which allows you to perform a host of tasks based on time, events, and various other conditions. So in this article, we bring you a detailed guide on how to automate tasks on Windows 10. Along with that, we have also shared a basic tutorial on PowerShell in the next section. Now having said that, let’s begin the article without further delay.

Automation on Windows 10

Before moving forward, let me summarily explain some broad points of this article. To automate tasks on Windows 10, there are essentially two methods. The first one is a native tool called Task Scheduler which is quite easy and straightforward. And the next method is automation through PowerShell which is a bit complex, but also feature-rich. Now having gone through the outline of the article, let’s jump right in.

1. Automate Tasks on Windows 10 Using Task Scheduler

The best way to learn something is by solving problems. So, here we will implement a basic task. For example, let’s say every time we turn on our computer, it opens a browser and then heads to some cool websites. So all we have to do is automate this routine task so that we can save time and boatloads of clicks. Let’s begin.

1. Press the Windows key once and type “Task Scheduler”. Open the first result and pin it on your taskbar because you are going to need it all the time.

automate tasks on windows 10

2. The UI may look a bit daunting in the beginning, but just follow my instructions and you will be off to the races. Now, click on “Create Task” on the right panel.

2

3. After that, provide a name to your task and check the box for “Run with highest privileges”. It will not prompt UAC or ask for any administrator permission before running the task.

3

4. Now switch to the “Triggers” tab above and click on the “New” button.

automate tasks on windows 10

5. Here, choose “At log on” option from the drop-down menu and click on the “OK” button. You can also delay the task by a few seconds, but let’s just leave it for now. As a side note, I always delay my internet-related tasks by 30 seconds so that the computer can connect to WiFi and be ready in time.

5

  • Define the Action

6. Now, switch to the “Actions” tab and click on the “New” button. Here, choose “Start a program” from the drop-down menu as we will be opening Google Chrome.

6

7. Next, click on the “Browse” button and select Chrome from desktop or any location.

automate tasks on windows 10

8. After that, enter your website’s URL in the “Add Argument” box. For example, you can type beebom.com and click the “Ok” button. In case, you want to open multiple websites at once then just put a blank space in between and enter another website.

 beebom.com theverge.com

automate tasks on windows 10

  • You can also add your Spotify playlist or just about anything you want. Just make sure to put a space in between the websites. Chrome will open these websites automatically the moment you log in to your computer. Do note that, you can just write the domain name or provide the whole https link. Anything works!
 beebom.com theverge.com https://open.spotify.com/playlist/37i9dQZF1DX2Ja6eBQeGaS

9. Having done that, switch to the “Conditions” tab and uncheck both the options under the “Power” section. It will allow the PC to run the task irrespective of battery or charging status.

9

10. Finally, move to the “Settings” tab. Here, we don’t have to touch anything, but make sure “Allow task to be run on demand” is checked. Also, go through other options so that you can understand the scope of what you can do with Task Scheduler. Now, click on the “Ok” button.

10

11. You have successfully created a task to open your favorite websites after turning on your computer. You can find your task in the “Task Scheduler Library” on the left panel. If the task is not showing, hit the “Refresh” button on the action panel located on the right side.

17

12. Further, you can test the task manually if it’s running properly by pressing the “Run” button on the right panel. If it’s working fine then restart your computer and you will have your series of tasks automated in no time. Enjoy!

automate tasks on windows 10

So this task was for opening websites in Chrome, but there can be several use-cases based on your daily routine. For example, you can choose to connect to a particular WiFi point automatically, create a task to empty recycle bin after a certain amount of days, you can also start Office apps or just about anything you want. Granted, there are a lot of other things to learn, but for most of the tasks, you will be following similar steps mentioned above. The only changes will have to be made in the “Action” and “Triggers” tab, but apart from that everything remains similar. Also, I would advise you to tinker with different settings to understand Task Scheduling properly.

2. Automate Tasks on Windows 10 Using PowerShell

In the above section, we learned how to automate tasks using Task Scheduler. But there is a native scripting tool on Windows 10 called PowerShell which is quite advanced and versatile. You can go about doing anything with a few commands. I know many users dread seeing the blue screen of PowerShell, but believe me, it’s quite easy once you get the whiff. Let me just say, it’s not hardcore programming so do not worry.

Apart from that, there are some key differences between PowerShell and Task Scheduler. PowerShell is not an automation tool but a scripting tool. It still requires Task Scheduler to automate its script. Whereas Task Scheduler is a complete tool in itself where you can create scripts and also automate those tasks.

Apart from that, in terms of performance, Task Scheduler is quite fast because it executes everything from the app. However, its scope is relatively limited as you can’t delve deep into other programs and features. So, if you have a small task at hand then Task Scheduler is great. However, PowerShell is very dynamic and can interact with many programs at once, but it’s relatively slow at executing those commands. So basically, on one hand, you get faster execution but have limited scope and on the other hand, you get versatile support, but slower execution. Nevertheless, here we will go through the same example as above to check how both fare against each other.

  • Get Started with PowerShell Syntax

Let me begin with an example. What you are seeing below is a PowerShell command to open multiple websites in Chrome. Here, Start-Process is a command to start a program and chrome.exe is the executable name of the program. After that, websites are provided with a blank space under double-quotes. Very similar to Task Scheduler, right? Easy peasy.

Start-Process "chrome.exe" "beebom.com theverge.com"

11

You can also add your Spotify playlist, favorite subreddits or anything you wish.

Start-Process "chrome.exe" "beebom.com theverge.com https://www.reddit.com/r/Android 
https://open.spotify.com/playlist/37i9dQZF1DX2Ja6eBQeGaS"

Now that you have understood the syntax and what different arguments of PowerShell command mean, let’s begin with the steps.

  • Steps to Create PowerShell Script

1. Open a Notepad file and paste the below command.

Start-Process "chrome.exe" "beebom.com theverge.com https://www.reddit.com/r/Android 
https://open.spotify.com/playlist/37i9dQZF1DX2Ja6eBQeGaS"

19

2. You can change the website as per your preference. And if you want to provide a different browser, right-click on the browser icon and open “Properties”. In the target box, copy the last XXXX.exe part and paste it in the Notepad file. This way, you can find executable names for other programs as well.

Note: In case it’s not working, you can paste the whole address from the target box. Here’s an example of the Microsoft Edge browser. You can do this for any program.

Start-Process "C:\Program Files (x86)\Microsoft\Edge Beta\Application\msedge.exe" 
"beebom.com theverge.com"

14

3. Now, go to “File” on Notepad and click on “Save As”. Here, give a name to your script and then add .ps1 extension at the end. PS1 is the extension of PowerShell scripts. Also, make sure to keep the file name as one word.

20

  • Define the Action

4. Having done that, open Task Scheduler and create a new task by following steps 1-5 mentioned in the above section. Once you are in the “Action” tab, choose “Start a program” from the drop-down menu and type powershell.exe in the Program/Script box.

15

5. Now, right-click on the PS1 file and open “Properties”. Here, you will find the file path in the location section. Copy it and add \filename.ps1 at the end. Here is how it should look. We will need this address in the next step.

C:\Users\Beebom\Desktop\browser.ps1

automate tasks on windows 10

6. Replace the below address with your address from the above step and paste it in the “Argument” box. After that, click the “Ok” button.

-windowstyle Hidden -file C:\Users\Beebom\Desktop\browser.ps1

16

7. Finally, you are done defining the Action part using PowerShell script. Now, follow the same steps from 9 to 12 from the Task Scheduler section. You can go ahead and test the script using the “Run” button. As I explained above, the PowerShell window might prompt a small popup window because it’s a tad slow in executing the script.

So that’s how you can create a simple script on PowerShell and automate it using Task Scheduler. What I showed above is just the tip of the iceberg. You can do a lot more and the possibilities are endless. For example, you can add commands to run a separate program, delete old files from certain folders, disable Windows 10 update and other OS level services, enable maintenance services, and more using the same PS1 file. You no longer have to go back to Task Scheduler to tweak anything, just make changes in the PS1 file using Notepad and it will run all the changes. Awesome, right? In the coming days, we will share some cool PowerShell scripts to automate tasks on Windows 10 so stay tuned with us.

Ace PowerShell Scripting and Automate Routine Tasks on Windows 10

So that was our in-depth guide on how to get started with automation on Windows 10. There are many hidden tools that we can take advantage of and Task Scheduler is one of them. And if you happen to know a few tricks of PowerShell then you can create multi-program scripts that will save you a lot of precious time. Anyway, that is all from us. If you liked this guide and could learn something new then do let us know in the comment section below.

How to Create a Virtual Machine on Windows 10

$
0
0

How to Create a Virtual Machine on Windows 10

Virtual Machine is a great way to test new operating systems, check the authenticity of unknown applications and also revisit older Windows OSes like XP or 7 for fun. Not to mention, now you can also use Linux on Windows 10 virtual machine and that is simply great. However, the sad part is that somehow it has remained a utility meant only for developers. Nevertheless, in this article, we bring you a detailed tutorial on how to create a virtual machine on Windows 10 along with some extra tips. Along with that, we have also provided solutions to common issues while creating a virtual machine. Now having said that, let’s go ahead and learn about the steps.

Virtual Machine on Windows 10

Before we begin, there are three key points you must know. In this article, we are not using a third-party program, but utilizing the powerful virtualization application called Hyper-V which comes pre-installed on Windows 10. Being a native application, Hyper-V works much better than any other program including VMWare and VirtualBox.

The second point is that your machine should be running a Pro, Enterprise or Education edition of Windows 10. Hyper-V is not available on the Home edition of Windows 10 so keep that in mind.

And the third point is, Hyper-V is not enabled out of the box and you have to execute a series of steps to enable it on Windows 10. In tandem, you will have to access your BIOS or UEFI settings to configure virtualization. So broadly these are the three points you must know before creating a virtual machine on Windows 10. Now having said that, let’s get started.

1. Enable Virtualization and Hyper-V Support

1. First of all, restart your computer and boot into BIOS. Usually, the boot key is F10 or F9, but if you are not sure, you can look for it on the internet depending on your PC manufacturer.

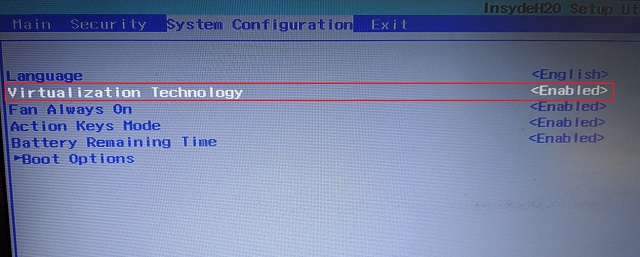
2. Mostly, in System Configuration or Advanced tab, you would find the option for “Virtualization”. All you have to do is enable it and save the changes by pressing the F10 key. After that, restart your computer normally and Virtualization will be enabled.

bios virtualization

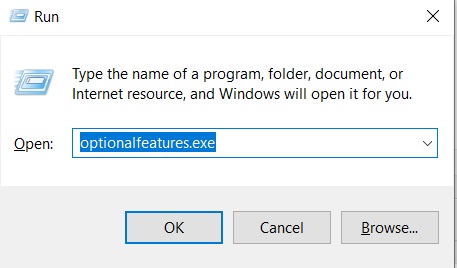
3. Next, we have to enable Hyper-V on your Windows 10 computer. To do so, press Windows and R keys at once to open a Run window. Now, type “optionalfeatures.exe” and hit enter.

1. Enable Virtualization and Hyper-V Support

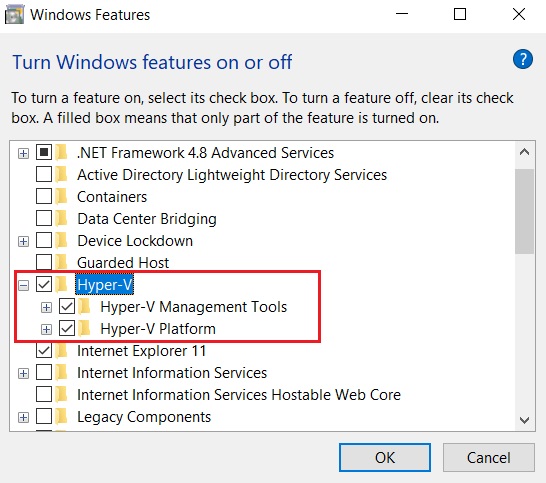
4. Here, scroll down and look for Hyper-V. Now, enable all the checkboxes under Hyper-V and hit the OK button. It will start installing the necessary packages and will ask you to restart the computer once the installation is done. Now, you are all set to create a virtual machine on Windows 10.

1. Enable Virtualization and Hyper-V Support 2

2. Create Windows 10 Virtual Machine

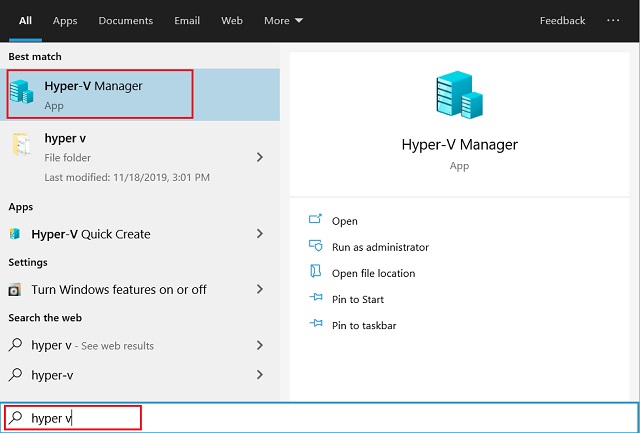
1. Press the Windows key once and type “Hyper-V” in the Start Menu and you would find the application on top. Open it.

2. Create Windows 10 Virtual Machine

2. Click on the “Quick Create” option on the right panel. It lets you set up things pretty fast.

2. Create Windows 10 Virtual Machine 2

3. Now, you can choose the operating system for which you want to create a virtual machine on Windows 10. The great part is that Hyper-V also supports Linux (Ubuntu) out of the box. Apart from that, you can also choose a local Windows 10 ISO image if you have already downloaded it like me.

2. Create Windows 10 Virtual Machine 3

4. Now, just hit the “Create Virtual Machine” button and wait for the process to complete.

2. Create Windows 10 Virtual Machine 4

5. Next, click on the “Connect” button and it will take you to the Virtual Machine.

Create a Virtual Machine on Windows 10

6. Finally, the virtual machine is ready and you can go through the Windows 10 installation process.

3. Some Errors and Their Solutions

While creating virtual machine on your Windows 10 device, you might encounter some errors. Here are some of the most common errors you may encounter and their solutions. 

  • Are You Getting ‘Start PXE Over IPv4’ Error? Here is the Fix

Sometimes, due to legacy BIOS, Hyper-V is unable to initialize the virtual machine. In that case, you can create the virtual machine manually using legacy standards (Generation 1). Also, if you have an older PC then this method is best way to create virtual machine on Windows 10. Here is how to go about it.

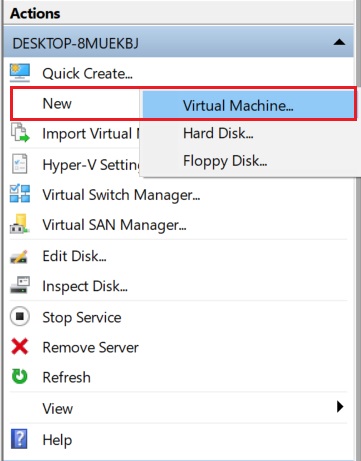
1. Click on “New” and select “Virtual Machine” from the right panel.

Are You Getting 'Start PXE Over IPv4' Error Here is the Fix

2. After that, give a name to your Windows 10 Virtual Machine and move to the “Specify Generation” section. Here, make sure to choose “Generation 1” and hit the “Next” button.

Create a Virtual Machine on Windows 10

3. Now, just keep moving ahead keeping the default settings intact until the “Connect Virtual Hard Disk” section. Here, enter the disk size of the virtual machine. I prefer to keep 20GB but you can choose your own disk space. Now, click on the “Next” button.

Are You Getting 'Start PXE Over IPv4' Error Here is the Fix 3

4. In the “Installation Options” section, choose the Windows 10 ISO image and move ahead.

Are You Getting 'Start PXE Over IPv4' Error Here is the Fix 4

4. After that, finish the setup wizard and you are done. In case if it shows any error, open the following file path in File Explorer and delete the existing virtual machines. After that, finish the setup.

C:\Users\Public\Documents\Hyper-V\Virtual hard disks

Are You Getting 'Start PXE Over IPv4' Error Here is the Fix 5

5. Now, your virtual machine is successfully created. Double-click on it and you will be taken to the installation of Windows 10 in a virtual machine instantly.

Create a Virtual Machine on Windows 10

Tinker Around Windows 10 on a Virtual Machine

So that is how you can install a virtual machine on Windows 10. While the steps are straightforward, we have to enable quite a few things to get everything right. And if you are using an old machine probably with a legacy BIOS then you will have to follow the alternate method mentioned above. Anyway, that is all from us. If the guide helped you create a VM on your Windows 10 without any issues then do let us know in the comment section below.

How to Set Up a Proxy Server on Windows 10 (Native Method)

$
0
0

How to Set Up a Proxy Server on Windows 10

While VPNs are undeniably advanced and better at routing internet traffic securely, proxy servers are still a quick go-to way for many users. It lets you access geographically restricted content and allows you to control your bandwidth usage with a simple intermediary called proxy server. The best part is that you don’t have to install any VPN application and the setup is almost a breeze. So in this article, I have shared an easy way to set up a proxy server on Windows 10. You just have to enter the proxy server’s IP address and you are done. Now having said that, let’s get started.

Set Up a Proxy Server on Windows 10

While you can use free proxy servers from the internet, we would advise you to pick a reliable and secure service provider if you are doing serious business on the internet. Anyway, here are the steps to configure proxy servers on Windows 10.

1. Press the Windows key once and type “Proxy” in the search box. After that, open “Proxy Settings” from the search result. Alternatively, you can also open the desired menu by following this path: Windows Settings -> Network and Internet -> Proxy.

How to Set Up a Proxy Server on Windows 10 1

2. Here, disable “Automatic proxy detection” and enter the forwarding URL under the script box and hit the “Save” button. This is the easiest way to set up a proxy server on Windows 10 using a PAC script offered by your service provider.

2

3. In case, you are old school, you can enter the IP address and port number manually in separate boxes just down below. In addition, you can mention websites that you don’t want to tunnel through the proxy server.

configure proxy server

Best Proxy Servers

There are a lot of free proxy servers available on the internet, but not all services offer good performance and enhanced security. However, few of the paid and reliable services are Oxylabs, MyprivateProxy and Luminati. In case, you are looking for free proxy servers, you can get a list from here.

Configure Proxy Server on Windows 10 in a Jiffy!

So that was a short guide on how to set up a proxy server on Windows 10. As we can see, the steps are quite easy and straightforward. That’s why Windows 10 is a great operating system as it allows you to make many network-related changes which can be very useful to IT administrators. Anyway, that is all from us. If you want to learn more about Windows 10, stay tuned with us.


Windows 10 Stuck on Checking For Updates? Here’s the Fix

$
0
0

Windows 10 Stuck on Checking For Updates Here is the Fix

While Microsoft has doubled-down on updates with Windows 10, there are some basic issues that make the update experience disappointing. Many Windows 10 users have complained in the recent past that the updates get stuck on checking for updates for many days and it does not go away even after restarting the computer. In this article, we are going to tackle this issue. We have offered two full-proof methods which can restart the Windows update service from scratch so you can install updates without any issue. That being said, let’s begin the article and learn about the steps in detail.

Fix Stuck on Checking for Updates Issue on Windows 10

First of all, we will go through an automatic method where we will use a script file to reset the Windows Update Agent. Following that, we will use manual steps in case the automated script does not solve the “checking for updates” issue. Keep in mind, none of your personal data will be deleted in either process so no worries on this front. Now having said that, let’s begin without further delay.

  • Resolve Checking for Updates Issue on Windows 10 with a Script

1. All you have to do is download this ZIP file from here. It’s a script file written by
Manuel F. Gil to reset the Windows Update Agent. After downloading it, unzip the file on your computer.

Windows 10 Stuck on Checking For Updates 5

2. Next, open it and right-click on “ResetWUEng” and select “Run as Administrator”. Keep in mind, Administrator privilege is a must to fix the checking for updates error on Windows 10.

2

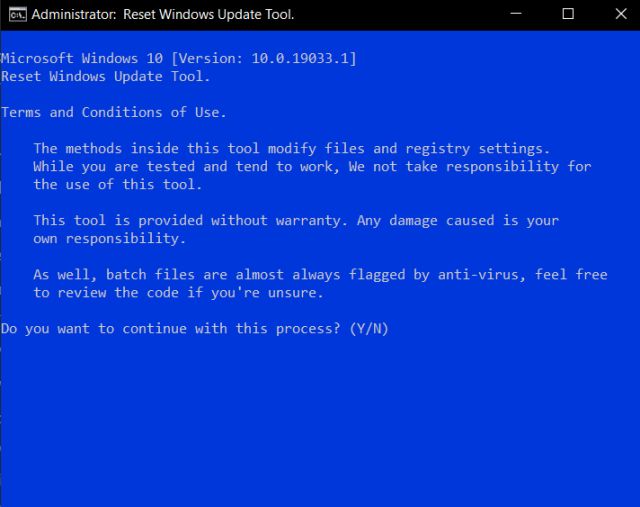
3. Now, a small window will open up asking for your permission to run the program. Type “Y” and hit enter.

3

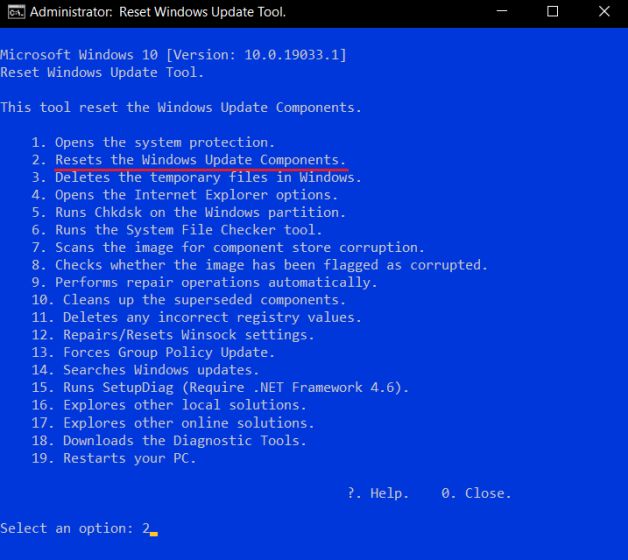
4. Next, type “2” to select “Resets the Windows Update Components” from the menu and then hit enter. It will immediately start checking for corrupted update files and invalid values in Registry.

Windows 10 Stuck on Checking For Updates 7

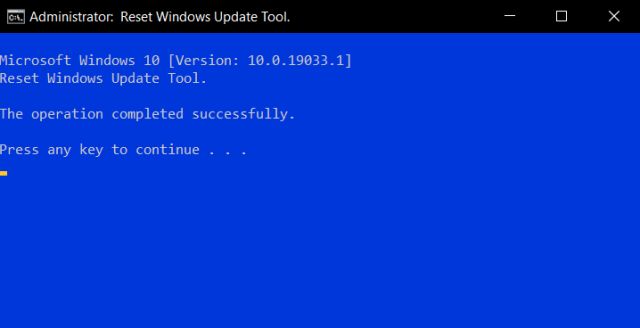
5. After a complete rundown, it will show an “operation completed” window within a few minutes. Now, close the window and restart your PC. The “Checking for Updates” error should be gone by now on your Windows 10 PC.

Windows 10 Stuck on Checking For Updates 6

  • Resolve Checking for Updates Issue on Windows 10 Manually

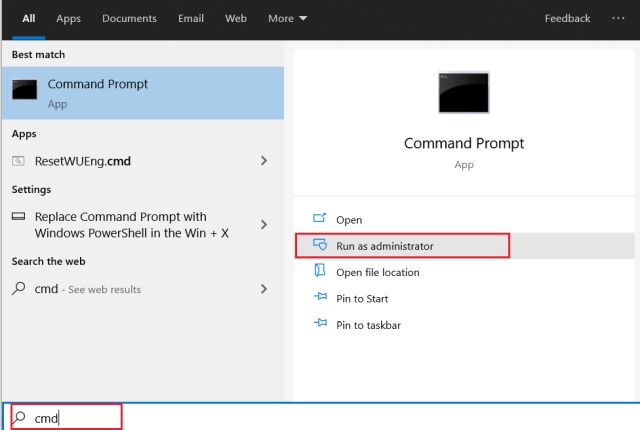
1. If you have some expertise on Windows 10, you can solve this problem without downloading any program. Just search for cmd in the search bar and click on “Run as administrator” in the right pane.

Windows 10 Stuck on Checking For Updates 4

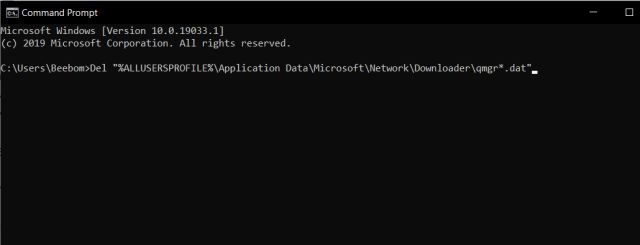
2. After that, paste the first command in Command Prompt and hit enter. It will delete the BITS (Background Intelligent Transfer Service) file which might have gone corrupt during a transfer service. Now, close the window. Alternatively, you can find the qmgr.dat file from the path below and delete the file manually.

Del "%ALLUSERSPROFILE%\Application Data\Microsoft\Network\Downloader\qmgr*.dat"
C:\ProgramData\Microsoft\Network\Downloader

Windows 10 Stuck on Checking For Updates 3

3. Now, press Windows and R keys at once to open the Run window. Type services.msc in the text box and hit enter.

1

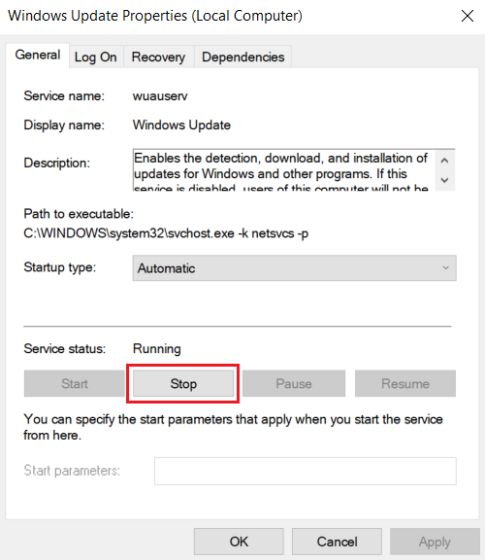
4. It will open the Windows Service Manager. Here, scroll down and look for “Windows Update”. Now, double-click on it to open the service and then click on the “Stop” button.

3

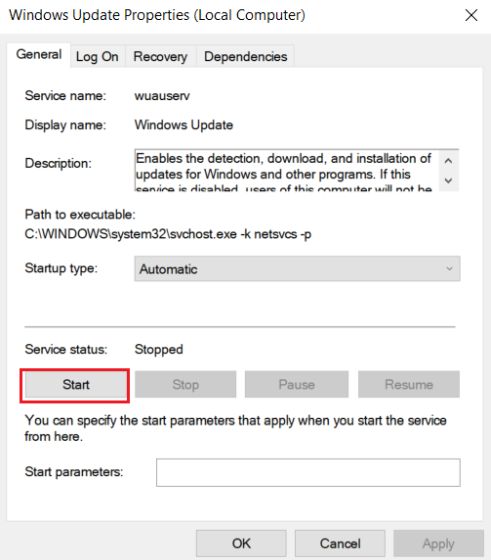
5. After a while, click on the “Start” button to restart the service. Now, close the window and restart your computer. This time you should not be stuck on Checking for Updates error on Windows 10.

Windows 10 Stuck on Checking For Updates 1

Is Your PC Still Stuck on Checking For Updates Error?

So that was our short tutorial on how you can fix checking for updates issues on Windows 10. We have mentioned both automatic and manual methods so you can choose whichever one you find easier to use. Apart from that, most of the time, the Windows update gets stuck due to issues like metered usage of your network or corruption in the downloaded image. Anyway, that is all from us. If our guide helped you fix the issue, do let us know in the comment section below.

How to Control Your PC with Google Assistant

$
0
0

How to Control Your PC with Google Assistant

While Windows 10 already has Cortana as its voice assistant, many users prefer Google Assistant for its great number of features and powerful capability to adapt to any ecosystem. However, the sad part is that Google Assistant is not available on desktop computers except Chromebooks and that is disappointing. Nevertheless, you should not be disheartened as we bring you an in-depth guide on how to control your PC with Google Assistant. In this article, I have mentioned some nifty ways to manage your computer with any Android smartphone, Google Home, Mini, Nest Hub, etc. So without further ado, let’s go ahead and learn how to control your PC with voice commands.

1. Control Your PC with Google Assistant

Before we begin, let me outline the basic premise of this tutorial. We are using an Android smartphone to control a Windows 10 PC. And for that, we are using Pushbullet and IFTTT apps on the mobile device and Push2Run application on the computer. Push2Run has been developed by Rob Latour and it’s completely free to use. The app is designed for automating tasks using voice commands and it’s excellent at that. So here is the break down of our task flow: Voice command through Google Assistant -> IFTTT -> Pushbullet -> Push2Run on PC -> Final execution of the task on PC. Now that you have got the basic idea, let’s begin.

1. First and foremost, install both Pushbullet (Free) and IFTTT (Free) apps on your Android device. After that, log in with your Google account on both the apps and allow necessary permissions. Make sure, you are using the same Google account across all apps and platforms.

2. Next, open Pushbullet and IFTTT‘s website on your PC and log in with the same Google account.

3. Having done that, now download and install the Push2Run (Free) application on your computer. You have almost set up the base, now we will move to the crucial steps.

4. Click on this link to open your Pushbullet’s account page. Now, scroll down and look for “Access Tokens”. After that, click on the “Create Access Token” button and it will offer you a string of key values. Copy that token and make sure you don’t share it with anyone.

Control Your PC with Google Assistant 3

5. Now open Push2Run application on your PC and go through the initial setup. On the first dialog, select “Pushbullet” in the left menu and check the box for “Enable Pushbullet”. After that, paste the copied token (from step #4) in the Pushbullet API box. Next, copy whatever is inside the “Title Filter” box and click on the “Ok” button.

Control Your PC with Google Assistant 4

6. Now, click on this link to create an IFTTT task. After that, click on the “+” button and then search for “Google Assistant”. Click on it and then select “Say a phrase with a text ingredient”.

Control Your PC with Google Assistant 1

7. On the next page, enter the voice commands that you will use to connect with your PC. I have chosen these commands to call on my PC, but you can choose your own set of commands. However, for now, I would advise you to follow my voice commands just so everything works without any issue. Keep in mind, the “$” sign is the task that you will ask your computer to execute. Finally, click on the “Create Trigger” button.

Note: In case, it shows some Google Assistant related errors, open this IFTTT Settings page and click on the “Edit” button. Now, authorize a fresh use of Google Assistant from your account.

Control Your PC with Google Assistant 11

8. Now onto the next page, click on “then that” part of the sentence. Here, search for “Pushbullet” and open it. After that, click on “Push a Note”. Next, paste the copied text from step #5 (Title Filter) inside the “Title” box. Finally, click on the “Create Action” button.

Control Your PC with Google Assistant 9

9. You are almost done. You can give a try by saying “OK Google tell my computer to open the calculator”. The calculator app should open up on your PC without any issue. Also, if everything is set up correctly, you should see “Pushbullet connection is good” in the bottom bar of the Push2Run app.

3

2. Create Push2Run Tasks

Now that you have successfully connected Google Assistant with your PC, you can create tasks that you would like to perform with a voice command. For example, in this section, I will show you how to open the Beebom website on PC with Google Assistant. Here we go.

1. Open the Push2Run app and click on “Actions” from the menu. Here, click on “Add”.

5

2. This is the window where you have to define everything. You can give a description of your task say, Beebom. Next, under the “Listen for” box, enter the voice command that you are likely to say. For example, I have entered, open beebom, open beebom.com, open beebom website. You can go to any length, right? Next, in the “Open” section, enter the URL directly. Make sure, the URLs have HTTP or www initializer. After that, hit the “OK” button.

Control Your PC with Google Assistant 7

3. Now, turn on the toggle in the main window and summon Google Assistant. Just say “tell my computer to open beebom” and your PC will instantly open the website in the default browser.

Note: We tried to open multiple websites through Chrome, but it didn’t work due to some bugs either in Push2Run or Windows 10. So, we changed the default web browser to Microsoft Edge and it started working flawlessly. To change the default browser from Windows Settings, open Settings -> Apps -> Default Apps -> Web Browser.

2

4. If you want to search for anything and not some particular website then you can create another task. Keep the description as you want and change “listen for” command to something like this: look for $, search for $ where $ is the query that you are searching for. And in the “Open” section, paste this: http://www.google.com/search?q=$. It will make sure the search results are from Google. Now summon your Assistant: “tell my computer to search for Beebom videos” and there you have it.

Control Your PC with Google Assistant 6

5. Similarly, here is another example of asking the Assistant to play a song on your PC through YouTube. We have used DuckDuckGo’s quick play URL feature. Here is the “Open” field for you to copy: https://duckduckgo.com/?q=!ducky+$+site%3Ayoutube.com

4

6. This is the last example in this article. Say, you want to shut down your computer with Google Assistant. It’s even easier. Keep the Open field as shutdown.exe and parameters as /s /t 10 /c "requested by Google Assistant". Here, we are using the native shutdown.exe program to turn off the computer and providing a bunch of parameters to convey a certain message.

/s means shutdown

/t 10 means shutdown after a timeout of 10 seconds

/c is a syntax for comments which is displayed before shut down

Note: As this task changes the state of the PC, it requires Admin permission. So to grant it, click on the “Actions” menu and grant “Push2Run Administrator Privilege”. 

Control Your PC with Google Assistant 5

What More Can We Do?

Well, in the above examples, I have shown you how to interact with browsers and system applications. But there is a lot more to learn about other syntax and third-party applications. For example, you can set the volume with a voice command, play/pause videos in the VLC player, update your shopping list in a Notepad and more. I have not even mentioned Batch and Powershell integration with Push2Run. It would take PC automation to even greater heights. In the coming days, I will be bringing more in-depth tutorials so that we can interact with every Windows component with just a voice command. As for now, the developer behind Push2Run has a couple of ready-made example cards which you can simply import to the app.

Control Your Windows PC with Google Assistant Like a Pro

So that was our deep dive into how we can control Windows computers with Google Assistant. The Push2Run app is simply phenomenal and has made the automation process much more seamless. So, if you like the application, consider donating the developer here. Anyway, that is all from us. If you learned new things from the article and want to see similar tutorials in the future, do comment down below and let us know. And if you are facing any issue, let us know in the comment section.

How to Customize the Right-click Menu on Windows 10

$
0
0

How to Customize the Right-click Menu on Windows 10

While Windows 10 has definitely gotten better in terms of functionality and overall stability, it never ceases to amaze me that Microsoft still doesn’t take user experience seriously. For example, if you use a lot of third-party apps on your PC, the right-click menu gets cluttered by countless app extensions and there is no dedicated settings page to remove those items. Sometimes, due to heavy extensions littered in the right-click menu, you start getting a delayed response and that makes it even more frustrating. However, there are some easy ways you can fix the problem. So, in this article, I am going to show you how to customize the right-click menu on Windows 10 with a step by step guide.

Customize the Right-click Menu on Windows 10 with ShellExView

We are going to use a popular utility called ShellExView which is developed by Nirsoft. It’s a pretty lightweight program and completely free. The app allows you to disable context menus, filter extensions and more. So with all that said, let’s move to the steps.

1. Download ShellExView (Free) and install it on your PC.

2. Open the app and click on “Options” on the menu bar. Here, enable “Hide all Microsoft Entries” so that you find only the third-party apps with their context menu.

How to Customize the Right-click Menu on Windows 10 ShellExview

3. Now, just go through the list and disable the apps that you don’t want to see in the right-click menu. To do so, right-click on the extension name and choose “Disable Selected Items”. That’s it.

ShellExView

4. To reflect the changes, you will have to restart the Windows Explorer process. So open the “Options” menu again and click on “Restart Explorer”.

Customize the Right-click Menu on Windows 10 with ShellExView

5. Now, right-click on any file or folder and you will find no unnecessary apps on the context menu. Enjoy the minimal look!

ShellExView

6. If you also want to clean up Microsoft items from the right-click menu then enable the Microsoft Entries from step #2. And then go through the list carefully and disable accordingly. As you are dealing with system menus, make sure to tread with diligence.

Customize the Right-click Menu on Windows 10 Manually

If you are someone who wants to do things manually then this section is for you. You can easily customize the right-click menu on Windows 10 through the Registry Editor and without downloading any third-party software. So here is how to go about it.

1. Search for “Registry” in the Windows search bar and open it.

Customize the Right-click Menu on Windows 10 Manually

2. Next, paste the below address into the address bar of Registry Editor and hit enter.

HKEY_CLASSES_ROOT\*\shellex\ContextMenuHandlers

Customize the Right-click Menu on Windows 10 Manually

3. Here, you will find all the third-party context menus in the form of folders. All you have to do is, right-click on the folder and delete it. You are done.

Manually

Clean Up the Right-click Menu from Unnecessary Items

So that was our short guide on how to remove unnecessary apps from the right-click menu. As described above, we have mentioned two methods and both are quite easy. However, I would recommend you to go with ShellExView as it’s a lightweight and straightforward utility. As for me, I always want to keep my menus short and useful so this tool does wonders for my PC. Anyway, that is all from us. If you want to learn more about Windows 10 and some nifty tools, do comment down below and let us know.

Headphones Not Working on Windows 10? Here’s the Fix

$
0
0

Headphones Not Working on Windows 10 Here’s the Fix

Since Windows 10 supports a multitude of external devices — ranging from audio to scanners, and what not– the operating system also brings a fair share of problems. Recently, many Windows users reported that their headphones are not working on Windows 10 after the recent update. They went on to add that sometimes the PC does not even detect the headphone which is kind of unexpected. Nevertheless, in this article, we have shared detailed steps to fix the headphone issue in entirety. So with all that said, let’s go ahead and learn how to resolve the headphone issue on the latest version of Windows 10.

Headphones Not Working on Windows 10

Most of the time, due to multiple input sources including mic and speakers, Windows is unable to decide the output device. In such cases, you will have to manually choose your output sound device. Here is how you can do it.

1. Press the Windows key once and search for “sound”. After that, click on “Sound Settings”.

Headphones Not Working on Windows 10 1

2. Next, manually choose your headphone as the input (mic) and output device from the drop-down menu. Now, the headphone should work without any issue. In case, it’s still not working then click on “Device Properties”.

Headphones Not Working on Windows 10 3

3. Here, make sure the device is not “Disabled”. Do a similar checkup under the input device as well.

Headphones Not Working on Windows 10 2

4. After doing all of that, if the issue still persists then click on the “Troubleshoot” button so that Windows can detect and fix the problem automatically.

Headphones Not Working on Windows 10

5. If you are still facing headphone issues on Windows 10 then configure the sound settings from Control Panel. Press Windows and R keys at once and paste the below command in the Run window and hit enter.

control.exe /name Microsoft.Sound

Headphones Not Working on Windows 10

6. After that, right-click on your headphone and enable it if the headphone is disabled. This will ensure that your headphone always remains the active output device. But, if your device is not showing in the list then it seems a driver issue. In that case, move to the next section to update your audio driver.

Headphones Not Working on Windows 10

Headphones Not Detecting on Windows 10

If the headphones are not detecting on Windows 10 then it’s likely the audio driver that is missing. So, here I will show you how to fix this specific problem.

1. Press “Windows” and “X” keys at once to open the contextual start menu. Here, click on “Device Manager”.

Headphones Not Detecting on Windows 10

2. Now, double-click on “Audio inputs and outputs” to expand the menu. Here, you should find your headphone listing. Right-click on it and open “Update driver”.

Headphones Not Detecting on Windows 10

3. After that, on the next window, choose “Search automatically for drivers”. It will start looking for the latest driver from the internet and will install the update automatically. After that, restart your computer and check if your headphone is being detected on Windows 10.

Headphones Not Detecting on Windows 10

4. In case the headphone is still not showing up, there are possibilities of hardware failure either on the audio port of the PC or the headphone itself. In such a case, you will have to get it repaired from the service center.

Resolve Headphones Issues on Windows 10 with Native Sound Application

While Windows offers dedicated control for sound-related settings, the PC comes pre-installed with a hidden sound application that is installed by the audio driver. It’s basically a sound profile application that the majority of Windows computers ship with. For example, if the audio driver is optimized by DTS, you will have the sound application by DTS. Similar is the case for Realtek, Bang & Olufsen, Dolby and more. So all you have to do is, search for the sound application in the Windows search bar and configure it to enable your headphones. Here is how to do it.

1. Open the sound application from the search bar.

Resolve Headphones Issues on Windows 10 with Native Sound Application

2. Next, move to the “Listening Experience” tab and choose your “Speaker/Headphone” as the default device. After that, click on the “Save” button. Finally, this should fix the headphone issue on Windows 10.

Resolve Headphones Issues on Windows 10 with Native Sound Application

Headphones Not Working on Windows 10: Could We Resolve the Problem?

So that was our look into the headphone issue on Windows 10 and its possible solutions. We have offered multiple ways to fix the issue so go through the steps and you will likely fix the problem. In case, the device is not showing up at all then I suggest that you update the driver first and then try out the other methods. If nothing works, you can as a last resort, reset your Windows 10 device. Anyway, that is all from us. If you are still facing the headphone issue on Windows 10 then elaborate your problem in the comment section below. We will definitely take a look at it.

How to Fix Black Screen Issues on Windows 10

$
0
0

How to Fix Black Screen Issues on Windows 10

Windows 10 has this weird issue where after a successful login, everything disappears leaving behind a deadpan black screen and a mouse cursor. In fact, the problem is not new and it has been happening on Windows 7 for years. Clearly, the problem is with the Windows Explorer or the user account profile which goes corrupt due to various issues. So, in this article, we are going to share four easy ways to fix the black screen issue on Windows 10. Along with that, we have also mentioned some workarounds in case you want to back up your data. So, without further delay, let’s begin the guide.

Fix Black Screen Issues on Windows 10

Before we move forward, let me clarify, the black screen error does not mean your data has been lost. Everything including your personal files to disk drives are intact, just that the GUI which allows you to interact with the computer has gone bust. So to fix that, we have offered four different methods and hopefully, by the end of the guide, you will have a working PC again. So with all that said, let’s begin the tutorial with the most preliminary method.

1. Restore the Explorer to Resolve Black Screen Issue on Windows 10

1. Explorer is the GUI element of Windows computers so we will restore that first and see if it’s working or not. Press Ctrl + Alt + Del keys at once and a new window will open up. Here, click on “Task Manager”.

1. Restore the Explorer to Resolve Black Screen Issue on Windows 10

2. Now, click on the “File” menu and select “Run new task”. Here, enter explorer.exe and click on the “Ok” button. Upon doing this, the black screen issue should be gone by now.

How to Fix Black Screen Issues on Windows 10 0

3. In case, it does not resolve the issue then you may have to change the Explorer configuration in Registry settings. Open a new task again in Task Manager and type regedit and hit enter.

1. Restore the Explorer to Resolve Black Screen Issue on Windows 10

3. After that, paste the below path in the Registry address bar and hit enter. You will be taken to the WinLogon folder instantly.

Computer\HKEY_LOCAL_MACHINE\SOFTWARE\Microsoft\Windows NT\CurrentVersion\Winlogon

1. Restore the Explorer to Resolve Black Screen Issue on Windows 10

4. Next, scroll down and look for the “Shell” entry. Double-click on it and ensure the value data is explorer.exe . If it’s not the case, enter explorer.exe manually and click on the “Ok” button.

1. Restore the Explorer to Resolve Black Screen Issue on Windows 10

5. Once done, close the Registry and restart your computer. This time you should not see a black screen on your Windows 10 PC.

2. Fix Windows 10 Black Screen Issue with Advanced Options

  • Manage Graphics Driver

1. Similar to what we did in the first section, press Ctrl + Alt + Del keys at once to open a new window. Here, click on the power button at the bottom-right corner. Now, press and hold the “shift” button and then click on “Restart”. Release the Shift button only after the screen shows “Please Wait”.

Fix Black Screen Issues on Windows 10

2. The computer will boot into the Advanced Options screen. Here, click on Troubleshoot and then open Advanced Options. Once you are here, click on “Startup Settings” to boot into Safe mode. After that, click on “Restart”.

Manage Graphics Driver

3. Now, on the Startup window, press 5 key on your keyboard to enter into “Safe Mode with Networking”. It will allow you to uninstall or update the graphics driver.

Fix Black Screen Issues on Windows 10

4. Once you boot into the Safe mode, press “Windows” and “X” keys to open the contextual start menu. Here, click on “Device Manager”.

Manage Graphics Driver

5. Double-click on “Display adapters” to expand the menu and then right-click on the driver listing. Now, if you feel some wrong driver has been updated on your system then click on “Uninstall Device”. After that, restart your PC.

Manage Graphics Driver

6. And in case, you think the driver has not been updated for a long time, click on “Update driver”. Next, select “Search automatically” so that your computer can automatically download and install the latest driver from the internet. Once done, restart the computer.

Manage Graphics Driver

7. However, if you find that Windows 10 is installing incorrect drivers from the internet then select “Browse my computer..” and choose the proper driver folder manually. You can download the compatible graphics driver directly from the manufacturer’s website or find it in the original CD that would have come while buying the PC. After that, restart your computer and it should boot normally without any black screen issue.

Fix Black Screen Issues on Windows 10

  • Uninstall Malicious Programs

1. In case, the above steps did not work, restart your computer back to Safe mode (Follow step #1 to #3 from the above section) and uninstall the apps that you think might be causing this problem. You can do so by pressing “Windows” and “X” keys at once and then open “Apps and Features”.

Uninstall Malicious Programs

2. Next, sort the applications by date and uninstall the recent applications. Also, go through the app list and look for malicious programs that you don’t remember installing. Remove those programs right away. After that, restart the PC and check whether the black screen is gone on Windows 10.

Fix Black Screen Issues on Windows 10

  • Go Back to the Previous Stable Build

1. If none of the above steps worked then you can roll back your PC to the last stable build. To do so, go to the Advanced Options screen and click on “Go back to the previous version”. Your PC will move to the last working build of Windows 10. Worry not, it won’t delete any of your personal files.

Go Back to the Previous Stable Build

2. Other than that, you can also use the “System Restore” option. Click on it and find the most recent restore point and proceed ahead. However, keep in mind, it will literally take your PC to the past and any modification in between either in files or programs will be lost.

Go Back to the Previous Stable Build

  • Restore System Health

1. There can also be issues with system files that might be causing this issue. To check and restore the authenticity of Windows 10 system files, open “Command Prompt” in the Advanced Options screen.

Restore System Health

2. Now enter the below command in command prompt window and hit enter. The process will take some time so keep patience. Once done, restart your computer and check if the black screen on Windows 10 is gone. Also, make sure to have an active internet connection while performing this operation.

dism /Online /Cleanup-Image /Restorehealth

Fix Black Screen Issues on Windows 10

3. Create a New User Account to Back Up Your Data

Sometimes when the user profile goes corrupt, the black screen shows up after logging into the system. In that case, you can create a new user account and move your old files to a new profile. Basically, you can clone the old user profile to a new one. Do not worry, all your files and disk drives will still be accessible on the new profile. So if you want to back up your data, this is the best way you can do it.

1. Open the Task Manager by pressing Ctrl + Alt + Del keys and then type compmgmt.msc in the task run. After that, check the box for “administrator privilege” and then hit enter.

Fix Black Screen Issues on Windows 10

2. Double click on “Local users and groups” to expand it and then open “Users”. Here, right-click in the main window and select “New User”. Now, provide a username, password (optional), and other descriptions and click on the “Create” button.

3. Create a New User Account to Back Up Your Data

3. After that, click on “Groups” in the left pane and then open “Administrators” in the main window.

3. Create a New User Account to Back Up Your Data

4. Next, click on the “Add” button at the bottom and enter the name of the user account. Keep in mind, you need to enter the username and not the full name. After that, click on the “Ok” button and restart your PC.

Fix Black Screen Issues on Windows 10

5. This time the computer should boot up normally. Now, all you have to do is log in to the new account. Further, open C:\Users\ and enable hidden items from the view tab. Here, open the old user account and copy all the folders and paste those into your user profile. This way you can clone your old profile to a new one.

Note: Do not copy the AppData folder and NTUSER.DAT file.

3. Create a New User Account to Back Up Your Data

Essentially, it’s a workaround rather than a solution to the black screen problem on Windows 10, but you can get your PC back without installing Windows 10 from scratch.

4. Reset Your PC to Get Rid of Black Screen Altogether

If your PC is showing a black screen just after turning on the computer then as a last resort, you will have to reset your computer. We have already made a detailed tutorial so click on the link to go through it and perform a reset operation. Make sure to go through the “Non-functional PCs” section where we have offered many solutions that can bring your PC back to life without formatting any personal data.

Fix Black Screen Issues on Windows 10

Resolve Black Screen Issues on Windows 10 Instantly

So that was our exhaustive look into how we can fix the black screen error on Windows 10. We have provided a total of four ways so you have all the choices to make. Other than that, we have also offered some advanced options which can restore your PC in a working state. So go through the guide step by step and you will likely fix the problem by yourself. Anyway, that is all from us. If the article helped you resolve the black screen issue on Windows 10 then do let us know in the comment section below.

Viewing all 203 articles
Browse latest View live